A WooCommerce Email Customizer is a tool or feature that lets you modify the default email templates sent by your WooCommerce store. These emails include things like order confirmations, shipping updates, and password resets. Instead of sticking with the plain, default designs, you can use a customizer to align these emails with your brand’s look and feel.
Think about it: every email your store sends is an opportunity to reinforce your branding and connect with your customers. With a WooCommerce Email Customizer, you can tweak everything from the logo and colors to the text and layout. You’re essentially making your emails a seamless extension of your website.
For anyone managing a WooCommerce site, this is huge. The default email templates are functional but often bland. They might not even include your logo! A customizer helps you turn those basic emails into something professional, memorable, and engaging.
Beyond aesthetics, it’s also about functionality. Want to add a personalized thank-you note or include a discount code in your order confirmation email? The right WooCommerce Email Customizer makes it easy to do this without diving into complex code.
At its core, this tool empowers you to make your emails work for you. Instead of being an afterthought, they become a strategic part of your customer journey—delivering value and showcasing your brand.
How to Customize WooCommerce Emails Easily
Customizing WooCommerce emails can be done in three simple ways:
- Use the Built-in WooCommerce Customization Tool: A basic option for small tweaks like changing colors, text, or adding a logo. Ideal for beginners who want quick updates without additional tools.
- Customize Emails with a Plugin: Plugins like Kadence WooCommerce Email Designer offer advanced features like drag-and-drop editing and prebuilt templates. Best for users who want flexibility and professional designs without touching code.
- Override the HTML File in Your Theme: This method involves editing the email template files directly in your theme folder. It’s perfect for developers or advanced users who need complete control over the email’s layout and content.
For most users, plugins are the best option due to their balance of ease and flexibility. Beginners can stick to the built-in tool for quick edits, while advanced users can explore HTML overrides for more complex customizations.
1. Use the Built-in WooCommerce Customization Tool
WooCommerce has a basic built-in email customization feature that you can access directly from your WordPress dashboard. It’s a simple way to make small changes to your email templates without needing any extra tools.
Here’s how you can access it:
- Go to your WordPress dashboard.
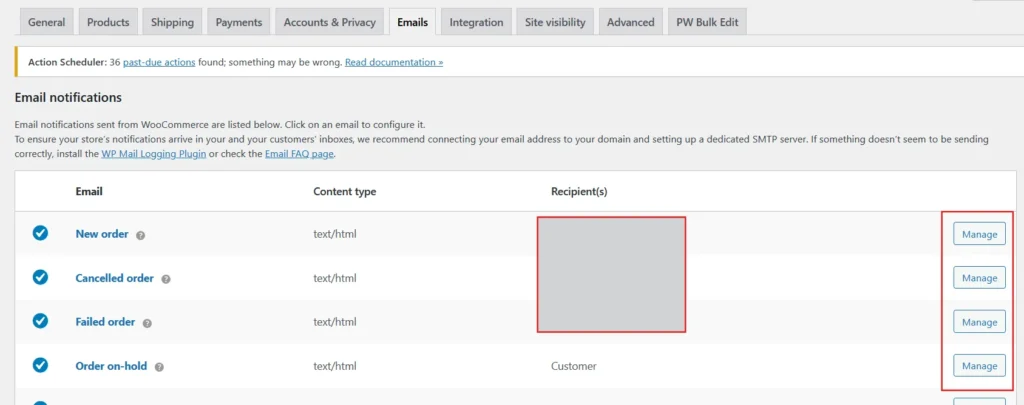
- Navigate to WooCommerce > Settings > Emails.
- You’ll see a list of email types, such as “New Order” or “Order Completed.” Click the Manage button next to the email you want to edit. At the bottom of this list, You can add your logo and change the colors of the email’s header, background, and footer.
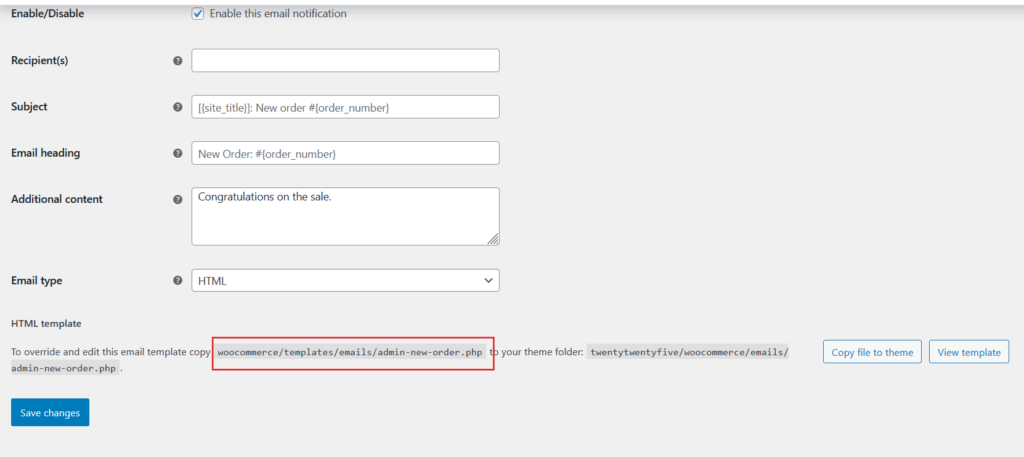
- You can customize the email subject, heading, and body text.

It’s pretty straightforward, but there are some limitations. For one, the built-in tool doesn’t offer much flexibility with layout changes. You can’t easily add new sections or move elements around. The design options are basic, which might not be enough if you want fully branded or more dynamic emails.
2. Customizing Emails with a Plugin
1. Choose a Plugin
Selecting the right WooCommerce Email Customizer plugin is the first step. Start by identifying your needs. Do you want drag-and-drop functionality? Pre-designed templates? Look for plugins with features that match your goals.
Some of the most popular options are:
- Email Customizer for WooCommerce: Ideal for simplicity and core features.
- Kadence WooCommerce Email Designer: Great if you’re looking for visual customization and responsive designs.
Check user reviews and ratings, and ensure the plugin is compatible with your version of WooCommerce.
2. Install and Activate the Plugin
Installing a plugin is straightforward. Here’s a quick walkthrough:
- Go to your WordPress dashboard.
- Navigate to Plugins > Add New.
- I prefer using the Kadence WooCommerce Email Designer, but feel free to choose a different plugin if it better suits your needs.
- Click Install Now, then hit Activate.
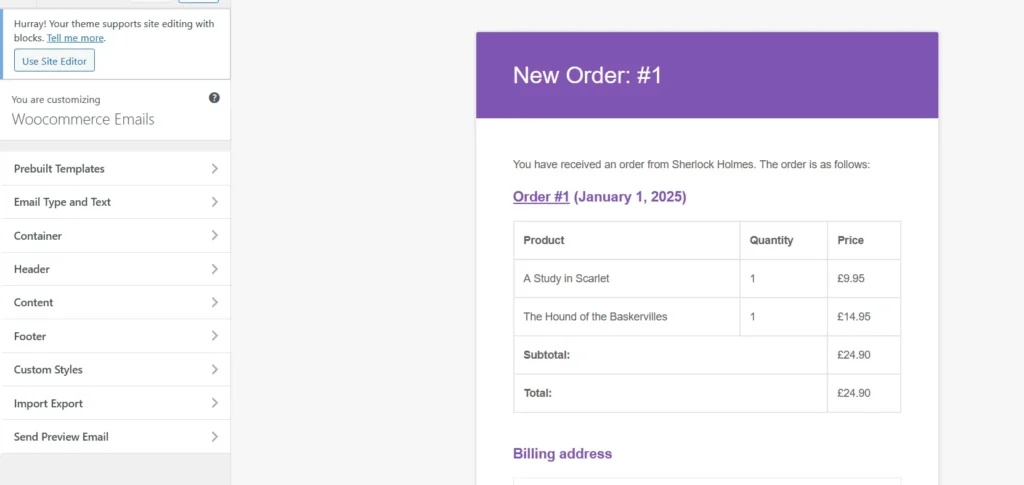
Once activated, navigate to your list of plugins, locate Kadence WooCommerce Email Designer and click on ‘Open Email Designer.’
3. Customize Email Templates
This is where the fun begins. With your plugin installed, you can start making your emails match your brand.

When you open the customizer page, on the left-hand side, you’ll find a settings menu with various options to edit your email template. Here are some key features:
- Prebuilt Templates:
This section allows you to completely change the email design. With a single click, you can import a prebuilt template, saving time and effort. - Email Type and Text:
Customize the header and body text for each email type(such as New Order or Canceled Order). You can set the recipients, subject lines, and additional text. - Container:
Adjust the email’s overall structure by setting the container width, background color, and other options for the email body.
Because explaining all the settings in detail would take too long, we’ve only explained some options here. You’ll find other settings, like Header, Footer, and Custom Styles, which are easy to navigate and use within the plugin.
4. Preview and Test Emails
Testing is critical. Even if your emails look great in the editor, they might not render perfectly in every email client.
- Send Test Emails: Most plugins have a “send test email” feature. Use it to preview how your emails look in popular clients like Gmail, Outlook. In Kadence WooCommerce Email Designer, you Send Preview Email to send a test email.
- Check Responsiveness: Make sure your designs adapt well to mobile devices. Over half of email opens happen on mobile, so this isn’t optional.
If you spot issues, tweak your design or simplify it. Simple designs are often the most effective across devices.
By testing thoroughly, you can confidently enable your email designs, knowing they’ll look great and function correctly for your customers.
3. Customize Emails by Overriding the HTML File in Your Theme
Another method for customizing WooCommerce emails is to override the HTML template files in your theme. This approach provides more control over the structure and content of your email templates, but it requires basic knowledge of HTML and file management.
Here’s how to do it:
- Locate the Template:
At the bottom of each email settings page in WooCommerce, you’ll find the file path of the template. For example:woocommerce/templates/emails/admin-new-order.php - Copy the Template to Your Child Theme:
Navigate to your WordPress installation folder via FTP or a file manager.- Go to
/wp-content/plugins/woocommerce/templates/emails/. - Locate the file you want to edit (e.g.,
admin-new-order.php). - Copy this file to your child theme under
/wp-content/themes/your-child-theme/woocommerce/emails/.
- Go to
- Edit the File:
Open the copied file in a text or code editor (like Notepad++ or VS Code).- Make your desired changes, such as modifying the email structure, adding custom text, or inserting additional HTML elements.
- Save Changes:
Save the file and upload it back to the same folder in your child theme. The customized email template will now override the default WooCommerce email. - Test Your Changes:
Send a test email from WooCommerce to ensure your customizations look and work as intended.
Why Use This Method?
This approach is ideal if you need advanced customizations that plugins or the WooCommerce email settings can’t achieve. For example, you might want to add custom data from your store, completely redesign the layout, or include additional logic in your emails.
Note that, always use a child theme when overriding templates to avoid losing your changes when updating your parent theme. If you’re not comfortable working with code, consider seeking help from a developer or using a plugin-based solution.
Common Issues and Troubleshooting Tips
Emails Not Sending or Showing Updates:
Sometimes, after using a WooCommerce Email Customizer, your emails may not send or reflect the changes you made. Here’s how I troubleshoot this:
- Check Plugin Settings:
Make sure your email customizer plugin is properly configured. Look for options like “enable email customization” or similar settings to ensure the plugin is active for all email types. - Verify WooCommerce Email Settings:
Go to WooCommerce > Settings > Emails and confirm that the email addresses for recipients are correctly set. Also, ensure the email types you’re customizing are enabled. - Check Your Server:
If emails still aren’t sending, it might be a hosting issue. WooCommerce relies on your WordPress site’s mail server to send emails. If that’s not working, consider using an SMTP plugin like WP Mail SMTP to ensure reliable email delivery. You can talk with your host provider to check this issue.
Design Breaks in Certain Email Clients:
Email designs sometimes look fine in the preview but break when viewed in clients like Gmail, Outlook, or Apple Mail. Here’s how I handle that:
- Use a Responsive Design:
Most modern email customizer plugins, like Kadence, create mobile-friendly designs. Stick to clean layouts and avoid overly complex elements that could break in certain email clients. - Test Across Platforms:
Use tools like Litmus or Email on Acid to preview your emails in multiple clients. Alternatively, send test emails to different accounts (e.g., Gmail, Yahoo, Outlook) to check how they render. - Simplify Custom Styles:
If you’ve added custom CSS, that could be causing compatibility issues. Keep your styling minimal and test thoroughly after making changes.
Conflicts with Other Plugins:
Conflicts between the WooCommerce Email Customizer and other plugins can lead to errors or missing features. Here’s how I troubleshoot plugin conflicts:
- Deactivate Other Plugins:
Temporarily deactivate all plugins except WooCommerce and the email customizer. If the issue is resolved, reactivate plugins one by one to identify the conflict. - Check for Updates:
Ensure both WooCommerce and your customizer plugin are up to date. Compatibility issues often arise from outdated plugins. - Consult Plugin Documentation:
Many plugin developers provide detailed documentation or FAQs to address common conflicts. Look for solutions specific to the conflicting plugins. - Reach Out for Support:
If you can’t resolve the issue, contact the plugin’s support team. They might already have a fix or workaround for the conflict.
Best Practices for Email Customization
Keep It Simple
When using a WooCommerce Email Customizer, simplicity should always be your priority. Overloading your emails with too many elements—like flashy graphics or excessive text—can confuse your customers. Emails are most effective when they’re clean, easy to read, and focused on delivering the key message.
For example, stick to one or two fonts and avoid clutter. Use enough white space to separate sections, like the order summary and contact details. Simplicity ensures your message is clear and the email renders correctly across all devices and email clients.
Use Consistent Branding
Your emails are an extension of your website, so they should reflect the same branding. This means using the same logo, colors, and tone of voice that customers associate with your store.
With a WooCommerce Email Customizer, it’s easy to upload your logo, match your email colors to your website’s palette, and adjust the typography to fit your brand. Consistency reinforces trust and makes your emails look professional.
Double-check that the branding elements look good in both light and dark modes since many email clients now support dark mode.
Include Clear CTAs
Every email you send should have a purpose. Whether it’s confirming an order, sharing a shipping update, or inviting a customer to explore more products, a clear call-to-action (CTA) is essential.
Use buttons or links that stand out and guide your customers toward the desired action. For example:
- A button with “View Your Order” for confirmation emails.
- A link saying “Track Your Shipment” in delivery updates.
- A CTA like “Shop More Deals” for promotional messages.
Make sure your CTAs are visually distinct by using contrasting colors and large, clickable buttons. Avoid placing multiple CTAs in the same email unless absolutely necessary—it can dilute the focus.
Conclusion
Customizing your WooCommerce emails isn’t just about making them look good. It’s about creating a consistent, professional experience for your customers. With a WooCommerce Email Customizer, you can align your emails with your brand, improve customer trust, and even drive more engagement through clear CTAs and tailored messaging.
The benefits are clear:
- Your emails stand out with personalized designs and branding.
- You provide a better customer experience by ensuring emails are functional, easy to read, and responsive.
- Customizations like discounts or upsells in confirmation emails can directly boost sales.
If you’re managing a WooCommerce site, there’s no reason to stick with the default templates. By following the steps I’ve shared—choosing the right tool, customizing templates, and testing thoroughly—you can create emails that truly work for your business.
Start today. Check out plugins like Kadence WooCommerce Email Designer or Email Customizer for WooCommerce to get up and running quickly. You’ll see just how much of a difference a little customization can make.
Your customers deserve emails that feel as professional as your store. And with these tips, you’re ready to deliver exactly that.


