Studies show that 22% of online shoppers abandon their carts simply because the checkout process is too long or complicated! (Source: Baymard institute)
For WooCommerce store owners, this is a critical issue; one that directly impacts revenue and customer satisfaction.
A well-optimized checkout page can make all the difference. By learning how to edit checkout page in WooCommerce, you can streamline the process, improve user experience, and recover lost sales.
In this guide, we’ll show you step-by-step how to change checkout page in woocommerce by editing fields and improving its design, helping you create a seamless and conversion-friendly experience for your customers.
How to Edit Checkout Page in WooCommerce? (Add or Remove Fields)
Editing WooCommerce checkout fields is essential when the default setup doesn’t match your business requirements. For example, you might need to add custom fields for specific data collection, remove unnecessary fields, or rearrange them for a smoother flow. Here’s how to edit WooCommerce checkout page effectively.
1. Using WooCommerce Settings
WooCommerce doesn’t provide built-in options for advanced field editing, but you can make basic changes like rearranging or hiding fields through the default interface.
Steps to remove or rearrange fields:
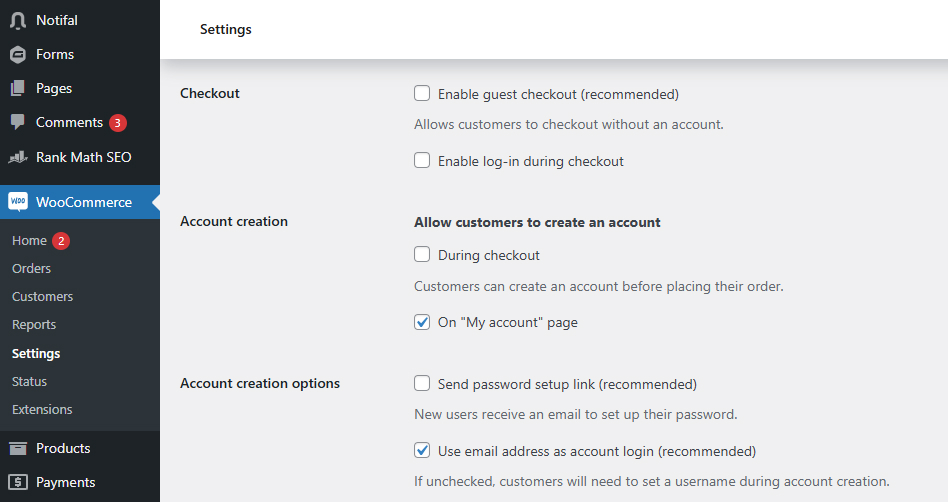
- Navigate to WooCommerce > Settings in your WordPress dashboard.
- Click on the Payments or Accounts & Privacy tab, depending on the fields you want to adjust.
- For some basic field customizations, toggle the relevant options, such as guest checkout or account creation.

For more advanced control, plugins or custom code are necessary.
2. Using Plugins to Edit Checkout Fields
Plugins simplify field editing without requiring technical knowledge. Tools like Checkout Field Editor allow you to add, remove, or rearrange fields effortlessly.
Steps to customize checkout fields using Checkout Field Editor:
- Install and activate the plugin.
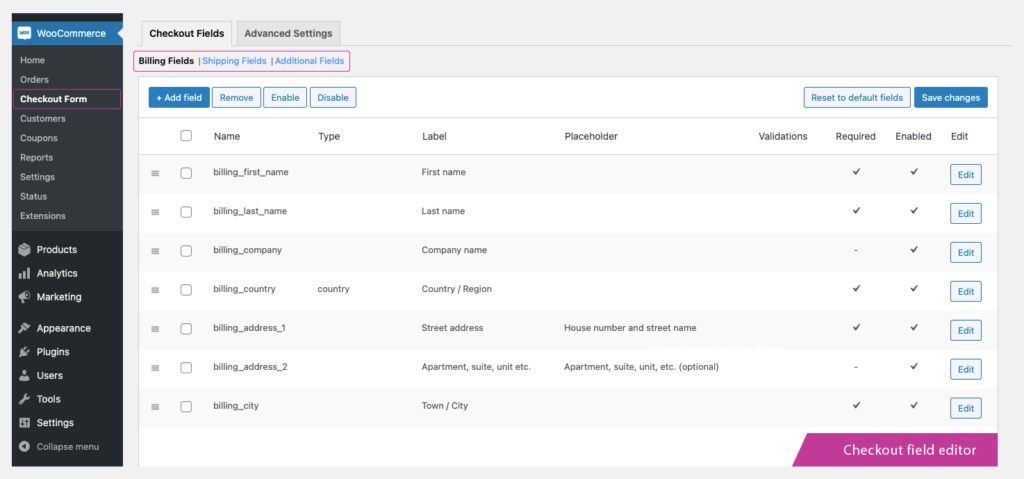
- Go to WooCommerce > Checkout Form in the WordPress dashboard.
- From here, you can:
- Add new fields: Click Add Field, select the field type (e.g., text, date, checkbox), and configure the settings.
- Edit existing fields: Modify labels, placeholders, or validation rules.
- Remove unwanted fields: Select unwanted fields and click Remove.
- Save your changes and preview the checkout page to ensure everything looks right.

3. Customizing Checkout Fields with Code
Editing checkout fields in WooCommerce using custom code can seem overwhelming, especially if you’re not familiar with WordPress development.
How to Add Custom Codes?
This guide will walk you through every step, from adding the code to testing it, ensuring you understand not only what to do but why.
Step 1: Locate the Theme’s functions.php File
The functions.php file is where you’ll add the custom code. Here’s how to find it:
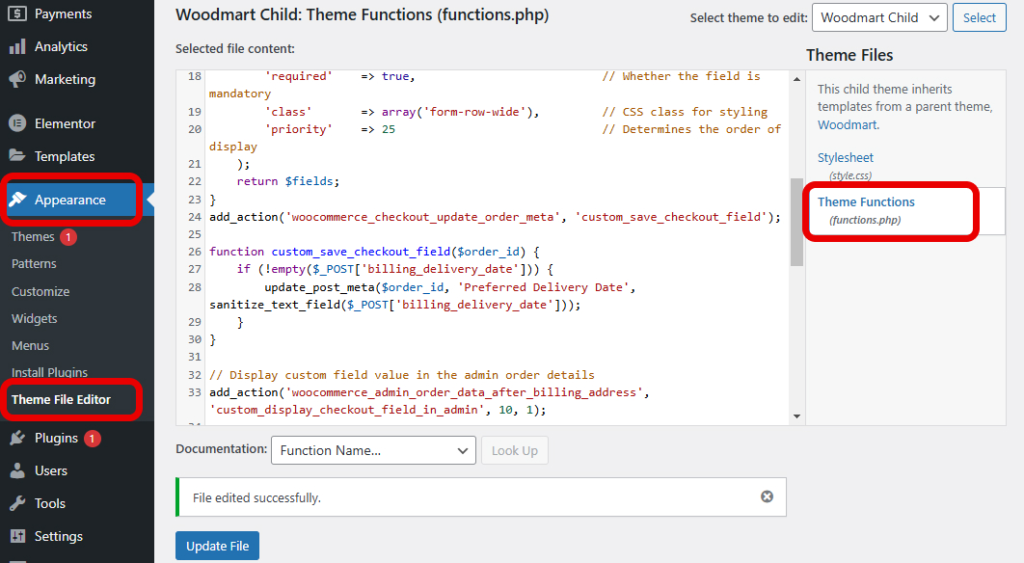
- Log in to your WordPress dashboard.
- Go to Appearance > Theme File Editor.
- In the right-hand list of files, find and select the functions.php file under your active theme.

Note: Before making changes to the file:
- Create a backup of your site.
- Use a child theme to avoid losing changes when the theme is updated.
Step 2: Add the Code
Once in the functions.php file, paste the code at the very bottom of the file. Make sure to add a comment like // Custom WooCommerce Checkout Fields to help identify the section later.
Step 3: Save and Test Changes
- Save the file after pasting the code.
- Open your WooCommerce checkout page in an incognito browser window to ensure the changes have been applied.
How to Remove Checkout Fields
Sometimes, the default WooCommerce checkout fields (e.g., “Company Name,” “Address Line 2”) aren’t relevant to your business. Removing unnecessary fields simplifies the checkout process, reducing cart abandonment.
Here’s the code to remove fields, along with explanations for each part:
// Remove default WooCommerce checkout fields
add_filter('woocommerce_checkout_fields', 'custom_remove_checkout_fields');

function custom_remove_checkout_fields($fields) {
    // Remove billing fields
    unset($fields['billing']['billing_first_name']);  // Removes "First Name"
    unset($fields['billing']['billing_last_name']);   // Removes "Last Name"
    unset($fields['billing']['billing_company']);     // Removes "Company Name"
    unset($fields['billing']['billing_address_1']);   // Removes "Address Line 1"
    unset($fields['billing']['billing_address_2']);   // Removes "Address Line 2"
    unset($fields['billing']['billing_city']);        // Removes "City"
    unset($fields['billing']['billing_state']);       // Removes "State"
    unset($fields['billing']['billing_postcode']);    // Removes "Postcode"
    unset($fields['billing']['billing_country']);     // Removes "Country"
    unset($fields['billing']['billing_phone']);       // Removes "Phone"
    unset($fields['billing']['billing_email']);       // Removes "Email"

    // Remove shipping fields
    unset($fields['shipping']['shipping_first_name']);  // Removes "Shipping First Name"
    unset($fields['shipping']['shipping_last_name']);   // Removes "Shipping Last Name"
    unset($fields['shipping']['shipping_address_1']);   // Removes "Shipping Address Line 1"
    unset($fields['shipping']['shipping_city']);        // Removes "Shipping City"
    unset($fields['shipping']['shipping_state']);       // Removes "Shipping State"
    unset($fields['shipping']['shipping_postcode']);    // Removes "Shipping Postcode"

    // Remove order comments
    unset($fields['order']['order_comments']);          // Removes "Order Notes"

    return $fields;
}
Explanation of the Code
add_filter: Hooks into WooCommerce’swoocommerce_checkout_fieldsfilter to modify the checkout fields.unset: Removes specific fields by targeting their identifiers (e.g.,'billing_first_name').- Sections:
- Billing: Fields related to billing information.
- Shipping: Fields related to shipping details.
- Order: Fields for additional notes or comments.
How to Customize:
- To remove a specific field, leave its
unsetline in the code. - To keep a field, delete or comment out its
unsetline (e.g.,// unset($fields['billing']['billing_first_name']);).
How to Add Custom Checkout Fields in WooCommerce?
Adding fields lets you collect additional information from your customers, like delivery preferences or custom requests.
Adding the Field to the Checkout Page
Here’s how to add a “Preferred Delivery Date” field:
// Add a custom field to the checkout page
add_filter('woocommerce_checkout_fields', 'custom_add_checkout_field');

function custom_add_checkout_field($fields) {
    $fields['billing']['billing_delivery_date'] = array(
        'type'        => 'date',                          // Field type
        'label'       => __('Preferred Delivery Date', 'woocommerce'),  // Label displayed to the user
        'placeholder' => __('Select a delivery date', 'woocommerce'),   // Placeholder text
        'required'    => true,                           // Whether the field is mandatory
        'class'       => array('form-row-wide'),         // CSS class for styling
        'priority'    => 25                              // Determines the order of display
    );
    return $fields;
}
Explanation of Parameters:
type: Defines the field type (e.g., text, email, date).label: The visible name of the field.placeholder: A short hint displayed inside the field.required: Settrueto make it mandatory.class: CSS classes to control the field’s style.priority: Determines where the field appears in the form.
Saving the Custom Field Value
After the user submits the form, you need to save the data in the order details:
// Save custom field value to order meta
add_action('woocommerce_checkout_update_order_meta', 'custom_save_checkout_field');

function custom_save_checkout_field($order_id) {
    if (!empty($_POST['billing_delivery_date'])) {
        update_post_meta($order_id, 'Preferred Delivery Date', sanitize_text_field($_POST['billing_delivery_date']));
    }
}woocommerce_checkout_update_order_meta: Hook to save custom fields when the order is created.sanitize_text_field: Ensures the input is cleaned to prevent malicious data.
Displaying the Custom Field Value
To show the field value in the admin order details:
// Display custom field value in the admin order details
add_action('woocommerce_admin_order_data_after_billing_address', 'custom_display_checkout_field_in_admin', 10, 1);

function custom_display_checkout_field_in_admin($order) {
    $delivery_date = get_post_meta($order->get_id(), 'Preferred Delivery Date', true);
    if ($delivery_date) {
        echo '<p><strong>' . __('Preferred Delivery Date:', 'woocommerce') . '</strong> ' . esc_html($delivery_date) . '</p>';
    }
}
Displaying the Custom Field in Emails
To include the field value in customer and admin emails:
// Include custom field value in WooCommerce emails
add_filter('woocommerce_email_order_meta_fields', 'custom_add_checkout_field_to_emails', 10, 3);

function custom_add_checkout_field_to_emails($fields, $sent_to_admin, $order) {
    $fields['Preferred Delivery Date'] = get_post_meta($order->get_id(), 'Preferred Delivery Date', true);
    return $fields;
}
Read more about: WooCommerce Email Customizer
Testing the Changes
- Add the code to
functions.php. - Go to the WooCommerce checkout page.
- Check if the new field appears and works as expected.
- Complete a test order to ensure:
- The field value is saved in the order meta.
- It displays in the admin panel and emails.
With these steps and explanations, you can confidently customize the WooCommerce checkout page to fit your business needs!
How to Change Checkout Page in WooCommerce? (Improve Design)
Enhancing the design of your WooCommerce checkout page can dramatically improve user experience and boost conversions. A clean, visually appealing checkout reduces friction and keeps customers engaged, minimizing cart abandonment.
Here’s how you can change the WooCommerce checkout page design step by step.
1. Using WooCommerce-Compatible Themes
The easiest way to enhance the checkout page design is by using a WooCommerce-compatible theme. Many themes come with pre-built checkout page layouts optimized for usability.
How to Select the Right Theme:
- Look for themes explicitly marked as WooCommerce-compatible.
- Check for demo layouts that showcase a modern, user-friendly checkout page.
- Ensure the theme is responsive and mobile-friendly, as many customers shop on mobile devices.
Popular WooCommerce-Compatible Themes:
- Astra: Lightweight and fully customizable with pre-built checkout templates.
- Woodmart: Focused on eCommerce with beautiful, ready-to-use designs.
- Flatsome: Clean and performance-focused, perfect for customization.
After installing a compatible theme, customize its settings under Appearance > Customize to match your branding.
2. Changing the Checkout Page Design with Plugins
If your theme doesn’t meet your needs, plugins like Elementor or CartFlows allow you to design your checkout page without coding.
Recommended Plugins:
- Elementor: A drag-and-drop builder with WooCommerce widgets for complete design control.
- CartFlows: Optimizes checkout and allows you to create custom, conversion-focused layouts.
Creating a Custom Checkout Page with Elementor
Using Elementor Pro, you can create a fully customized WooCommerce checkout page without touching a line of code. Follow these steps to design a professional and user-friendly checkout experience:
Step 1: Install and Activate Elementor Pro
- Go to your WordPress dashboard.
- Navigate to Plugins > Add New and search for “Elementor.”
- Install and activate Elementor (free version).
- Purchase and install Elementor Pro for access to WooCommerce widgets.
Step 2: Create a New Page for the Checkout
- In your WordPress dashboard, go to Pages > Add New.
- Name the page (e.g., “Custom Checkout Page”) and click Edit with Elementor.
Step 3: Add WooCommerce Checkout Widgets
- In Elementor’s editor, search for the WooCommerce Checkout widget in the widget panel.
- Drag and drop the widget into the design area.
- Elementor will display the default WooCommerce checkout form.
Step 4: Publish and Set as Default Checkout Page
- Click Publish in Elementor to save your custom checkout page.
- Go to WooCommerce > Settings > Advanced in your WordPress dashboard.
- Under the Checkout Page option, select your newly created page from the dropdown menu.
Elementor’s intuitive editor makes it easy to edit WooCommerce checkout pages without coding. You can add unique branding, streamline the process, and create an engaging experience—all with just a few clicks.
3. Customizing with CSS
Small CSS tweaks can significantly improve the look and feel of your checkout page. For example, you can adjust field spacing, change button colors, or highlight important sections.
Example CSS Changes
Style the Place Order Button
.woocommerce #place_order {
    background-color: #ff6600; /* Change button color */
    color: #fff;              /* Change text color */
    padding: 15px 30px;       /* Adjust size */
    border-radius: 5px;       /* Add rounded corners */
}
Highlight Required Fields
.woocommerce form .form-row.required label {
    font-weight: bold;
    color: #ff0000; /* Make the label red */
}
Improve Field Spacing
.woocommerce form .form-row {
    margin-bottom: 20px; /* Add space between fields */
}
How to Add CSS:
- Navigate to Appearance > Customize > Additional CSS in your WordPress dashboard.
- Paste the CSS code and click Publish.
- Refresh your checkout page to see the changes.
4. Advanced UI Changes with PHP and JavaScript
For complete control over the checkout page design, use WooCommerce hooks and templates. This requires basic knowledge of PHP and JavaScript.
Editing WooCommerce Templates:
- Copy the template file you want to edit:
- Navigate to
wp-content/plugins/woocommerce/templates/checkout/. - Copy the
form-checkout.phpfile to your child theme’s folder:wp-content/themes/[your-child-theme-folder-name]/woocommerce/checkout/.
- Navigate to
- Open the copied file and edit the HTML to rearrange fields or add custom elements.
By following these strategies, you can edit the WooCommerce checkout page design to create a visually appealing and user-friendly experience that aligns with your business goals. Whether using themes, plugins, CSS, or advanced coding, there’s a method for every skill level.
Conclusion
Customizing your WooCommerce checkout page is one of the most effective ways to improve user experience and boost conversions. By learning how to edit checkout page in WooCommerce, you can tailor the process to fit your business needs and create a smoother journey for your customers.
Whether you’re modifying checkout fields to simplify the form or enhancing the design with themes, plugins, or custom code, every small improvement can make a significant impact.
Tools like Elementor or Checkout Field Editor can help you quickly make changes, while advanced customizations with PHP and CSS give you full control over the layout and functionality.
Testing and optimizing these changes is crucial. Always preview your checkout page on different devices and browsers to ensure it’s responsive and user-friendly. Monitor metrics like cart abandonment rates and completion times to identify areas for further improvement.
By following these strategies, you can confidently customize the WooCommerce checkout page to align with your brand and meet your customers’ expectations. A well-optimized checkout not only enhances trust but also turns potential sales into loyal customers.
