If you’re managing a WooCommerce store, staying on top of your orders is critical. You need a reliable way to track, organize, and share this data without the hassle of manual updates. That’s where syncing your WooCommerce orders with Google Sheets comes in handy. It’s an easy and efficient way to streamline your workflow.
Why does this matter? Let me break it down. By automating this process, you save time, reduce manual errors, and gain real-time access to your store’s data. Whether you’re analyzing sales trends, collaborating with a team, or managing fulfillment, having orders synced to Google Sheets can make your life easier.
So, how do you send orders from WooCommerce to Google Sheets? The good news is you don’t need to be a tech wizard. From plugins or a custom Google Sheets API integration, there are solutions for every skill level. I’ll walk you through these methods step-by-step, so you can pick the one that works best for you.
Ready to simplify your order management? Let’s dive in!
How to Send Order from WooCommerce to Google Sheets: Step-by-Step Guide
Using a Plugin for Seamless Integration
If you’ve looked into syncing WooCommerce orders to Google Sheets, you’ve probably come across plugins like Uncanny Automator, Zapier, or WooCommerce GSheetConnector. These plugins are great for setting up basic integrations quickly. However, most of their advanced features, such as real-time syncing or customizable field mapping, are locked behind paid plans.
This can be frustrating if you’re looking for a cost-effective solution. That’s why I recommend using WooCommerce webhooks as a more flexible and free way to send orders from WooCommerce to Google Sheets. It’s an easy, actionable solution that doesn’t require expensive subscriptions or feature restrictions.
In the next section, I’ll guide you through setting up WooCommerce webhooks to directly connect your store to Google Sheets—no premium plugins required. Let’s get started!
Custom Integration Using Google Sheets API
If you’re looking for a cost-effective and flexible way to sync WooCommerce orders with Google Sheets, creating a custom integration using the Google Sheets API is a perfect solution. This method avoids the limitations of plugins and lets you automate data updates in real time.
Suppose you need to add these columns to your Google Sheet:
- Order Number
- First Name
- Last Name
- Order Status
- Order Link
Here’s how you can set it up step-by-step:
Step 1: Set Up Google Sheets API Credentials
To interact with Google Sheets programmatically, you need to enable the Google Sheets API and authenticate your script.
- Go to the Google Cloud Console.
- Create a new project or select an existing one.
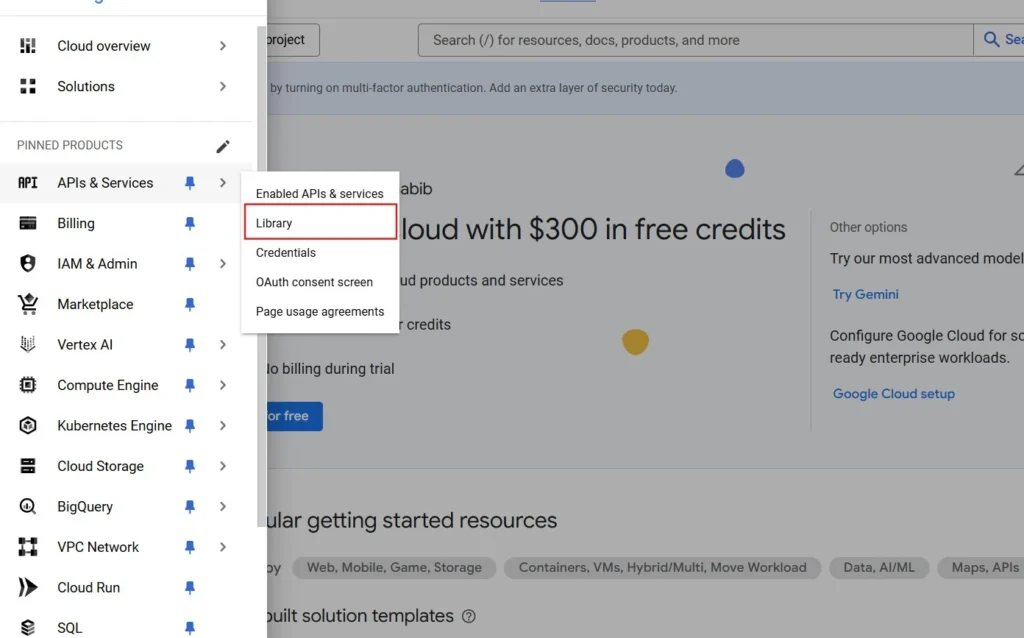
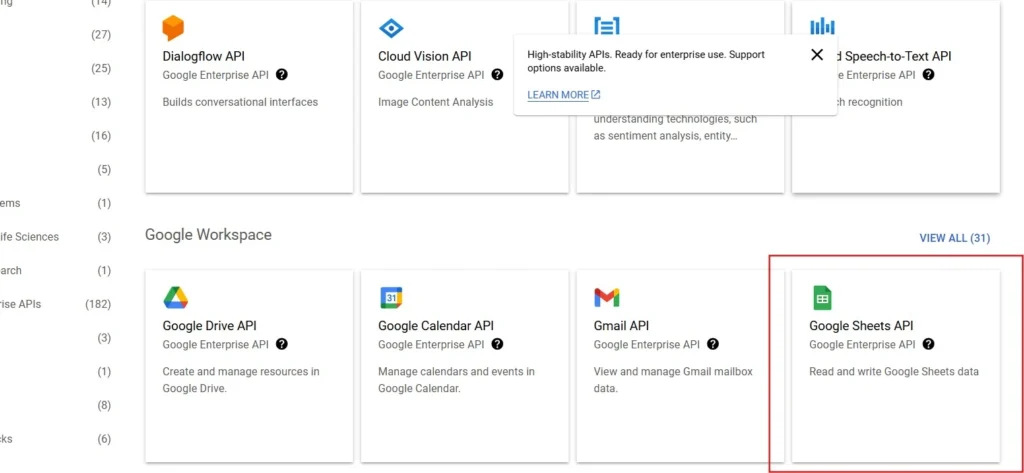
- Navigate to APIs & Services > Library, then search for Google Sheets API and enable it.
- Go to APIs & Services > Credentials:
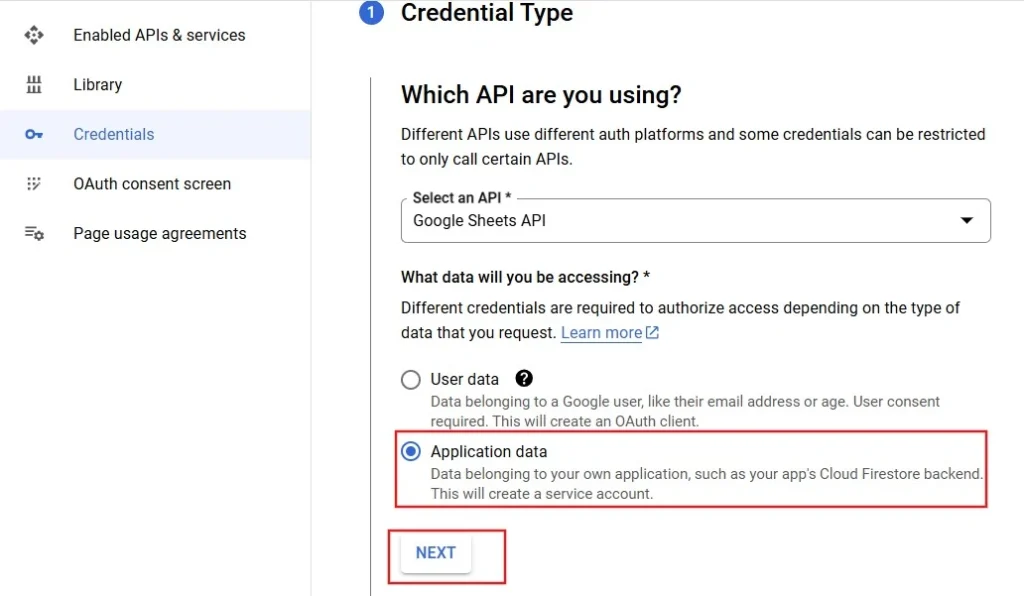
- Click Create Credentials and choose Service Account.
- Grant the service account at least “Editor” permissions for the Google Sheets project.
Select Application data and go to nextEnter service account name and click on create
Set Role to Editor then click on “DONE”
On the left menu, click on IAM & Admin
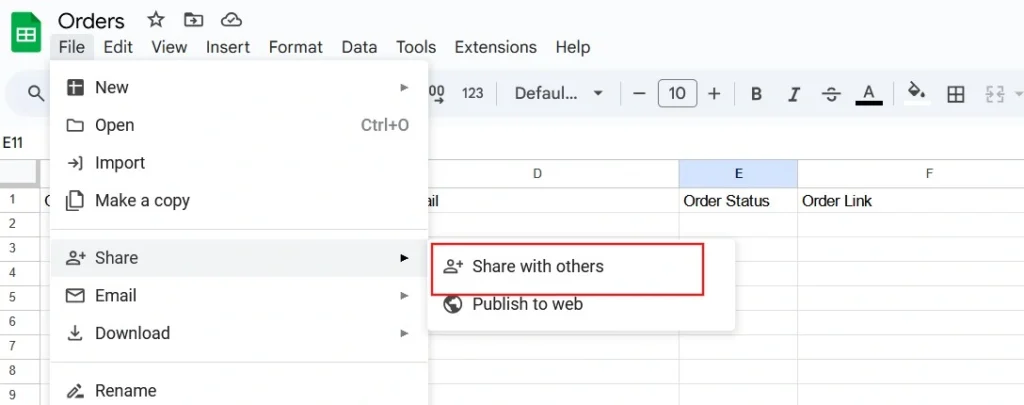
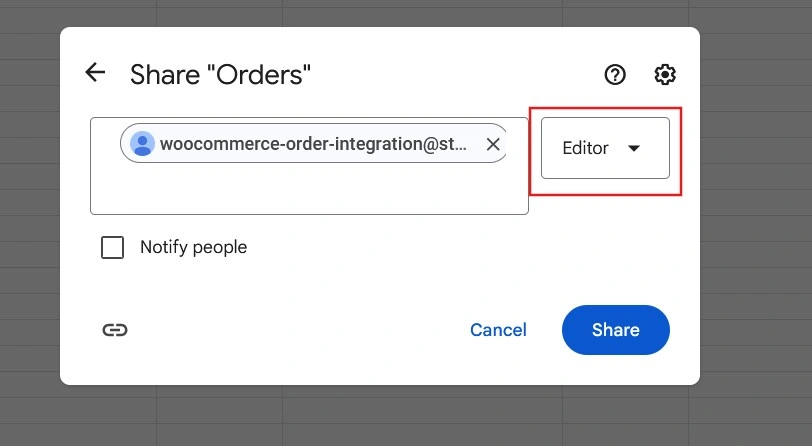
- Share your target Google Sheet with the service account email (it will look something like
[email protected]).

Step 2: Write the Apps Script
Create the script that will process WooCommerce data and send it to Google Sheets.
- Open your target Google Sheet.
- Go to Extensions > Apps Script.
Go to Extensions > Apps Script.
- Paste the following code into your script editor:
function doPost(e) {
  try {
    // Parse incoming JSON payload from WooCommerce
    const orderData = JSON.parse(e.postData.contents);

    // Extract necessary fields
    const orderNumber = orderData.id || "N/A";
    const firstName = orderData.billing?.first_name || "N/A";
    const lastName = orderData.billing?.last_name || "N/A";
    const email = orderData.billing?.email || "N/A";
    const orderStatus = orderData.status || "N/A";
    const orderLink = `https://yourstore.com/wp-admin/post.php?post=${orderData.id || "N/A"}&action=edit`;

    // Open Google Sheet and append the order data as a new row
    const sheet = SpreadsheetApp.getActiveSpreadsheet().getActiveSheet();
    sheet.appendRow([orderNumber, firstName, lastName, email, orderStatus, orderLink]);

    // Return success response
    return ContentService.createTextOutput("Order added successfully").setMimeType(ContentService.MimeType.TEXT);
  } catch (error) {
    // Log and return error message
    Logger.log("Error: " + error.message);
    return ContentService.createTextOutput("Error: " + error.message).setMimeType(ContentService.MimeType.TEXT);
  }
}
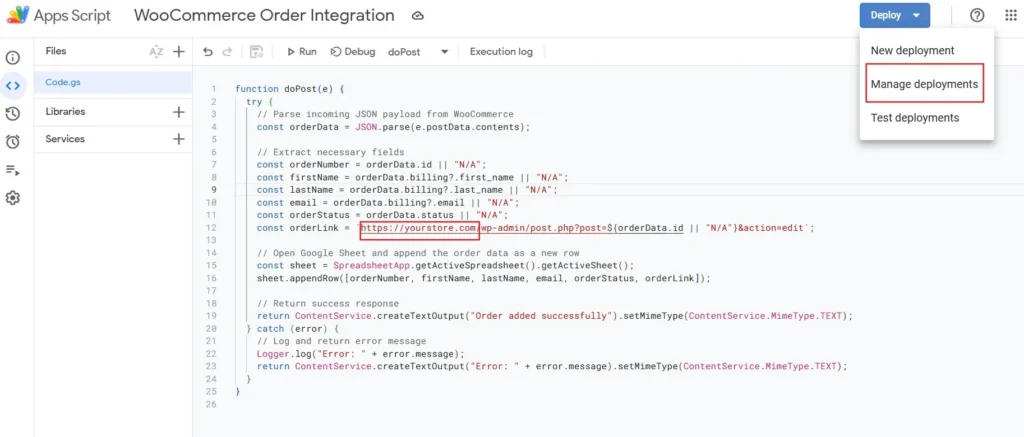
This script captures the Order Number, First Name, Last Name, Email, Order Status, and Order Link, then appends them as a new row in your Google Sheet. Dont forget to change orderLink “https://yourstore.com/” with your domain name.
Step 3: Deploy the Script as a Web App
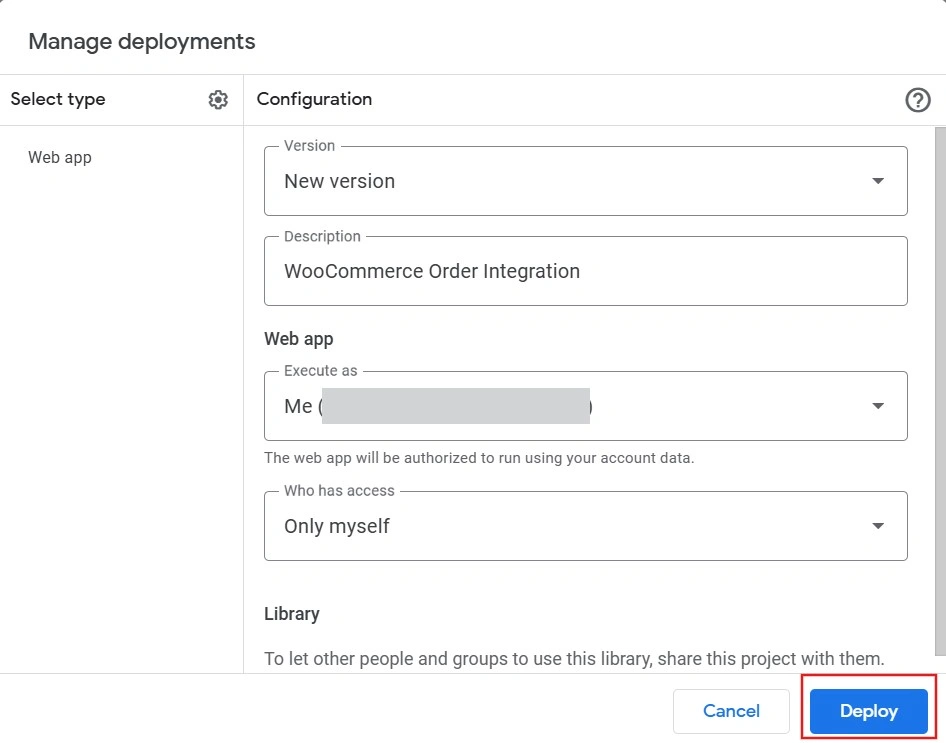
- In the Apps Script editor, click Deploy > Mangage Deployments.
- Choose Web App and fill in the following:
- Project Version: New.
- Execute As: Me.
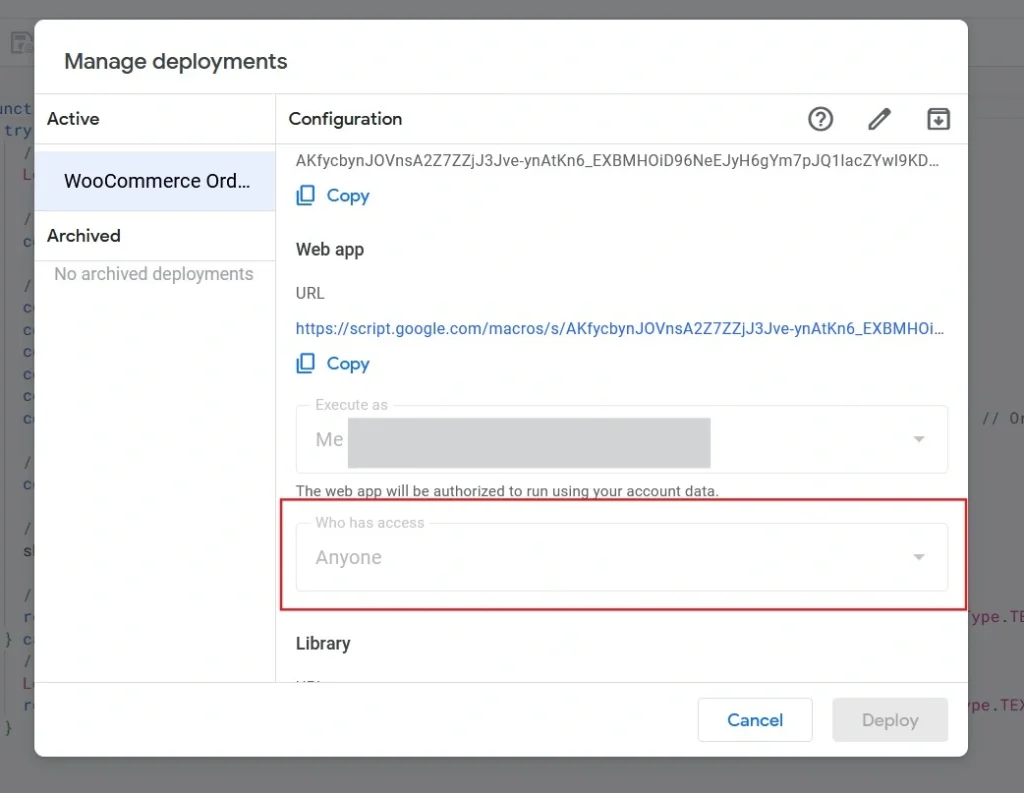
- Who Has Access: Anyone (In the screenshot, I forgot to set it to Anyone 😊)
Set Who has access to Anyone
- Click Deploy, authorize the script, and copy the Web App URL.
Step 4: Configure WooCommerce Webhook
Webhooks allow WooCommerce to send order details to your Google Apps Script when an order is created or updated.
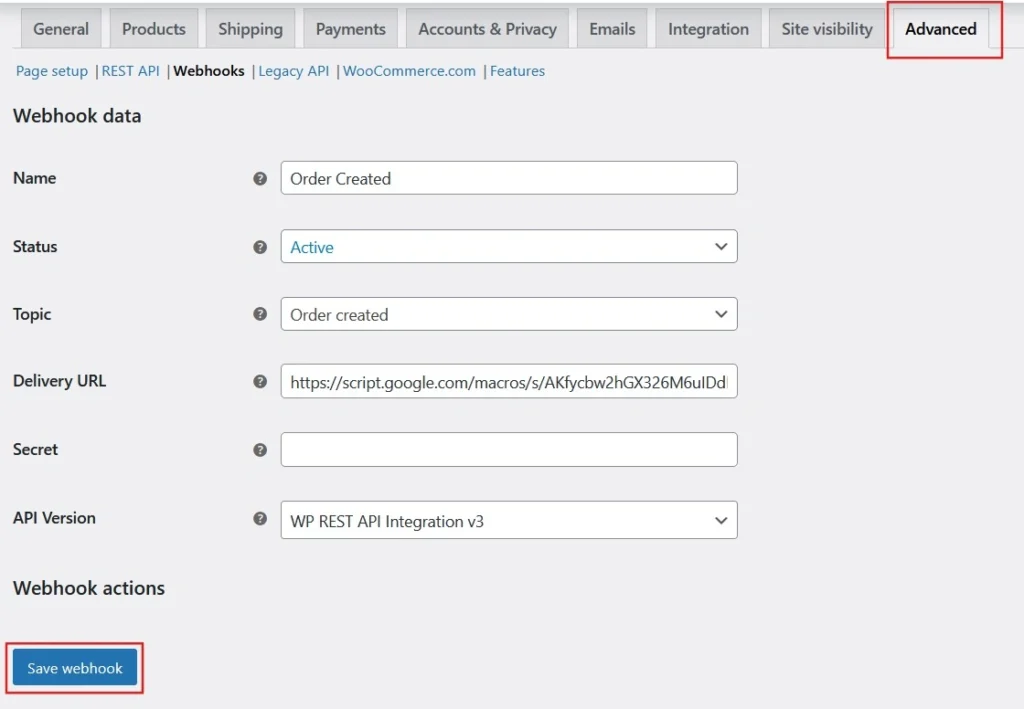
- Go to WooCommerce > Settings > Advanced > Webhooks.
- Click Add Webhook and fill in the following details:
- Name: “New Order to Google Sheets.” or something like this
- Status: Active.
- Topic: Order Created.
- Secret: leave it empty
- Delivery URL: Paste the Web App URL from Google Apps Script (we’ll create this in Step 3).
- Save the webhook. WooCommerce will now send data to your script whenever an order is created.
Step 5: Test the Integration
- Place a test order in your WooCommerce store.
- Check your Google Sheet to confirm that the order data appears as a new row with the correct columns:
- Order Number
- First Name
- Last Name
- Order Status
- Order Link
If everything works correctly, WooCommerce will automatically send order data to Google Sheets in real time.
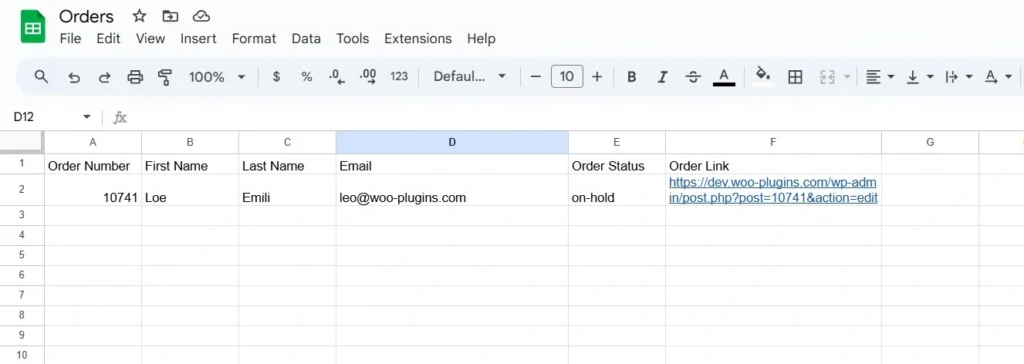
If you need help implementing the script, contact our support team via online chat. We can set this up for you in less than 1 hour! Don’t hesitate to reach out if you have any questions or need assistance.
Best Practices for Managing WooCommerce Orders in Google Sheets
Managing WooCommerce orders in Google Sheets can get messy if you don’t follow some best practices. Keeping your sheet organized and secure ensures you always have reliable data to work with. Here are a few tips that have worked for me:
Use Structured Templates
Start by creating a clear and consistent template for your Google Sheet. Each column should represent a specific data field like:
- Order Number
- First Name
- Last Name
- Order Status
- Order Link
Having a predefined structure makes it easier to organize, analyze, and share your data. Plus, when you send orders from WooCommerce to Google Sheets, the data automatically aligns with your template.
Automate Data Cleaning
Over time, your sheet might accumulate typos or incomplete data. Automating data cleaning can save you hours. Here’s what I suggest:
- Use Conditional Formatting: Highlight duplicate rows or missing fields for quick fixes.
- Apply Formulas: Use formulas like
=TRIM(A1)to clean up unnecessary spaces. - Write Cleanup Scripts: Create small scripts in Google Apps Script to remove unnecessary rows or format data consistently. For example, you can set all text to lowercase for email addresses or format dates automatically.
This ensures your WooCommerce data in Google Sheets stays clean and actionable.
Monitor Syncing
Syncing issues can happen, and missed orders can create chaos. Regularly monitor the syncing process to ensure no data is lost.
- Run Spot Checks: Compare recent orders in WooCommerce with your Google Sheet to confirm they match.
- Log Webhook Failures: WooCommerce provides logs for webhook activities. Check these logs to catch and resolve any issues.
- Automated Alerts: Use Google Apps Script to set up email notifications for sync errors or discrepancies.
Protect Sensitive Data
Your Google Sheet likely contains sensitive customer information, like names and email addresses. Protecting this data is critical.
- Access Controls: Share the sheet only with team members who need it. Use “Viewer” or “Commenter” access for those who don’t need editing rights.
- Encrypt Sheets: Use add-ons like Cryptosheets to encrypt sensitive data within Google Sheets.
- Audit Activity: Regularly check Google Sheet’s activity logs to ensure no unauthorized changes are made.
When you’re sending WooCommerce orders to Google Sheets, ensuring data security should always be a priority.
FAQs About Sending WooCommerce Orders to Google Sheets
If you’re managing WooCommerce orders in Google Sheets, you might have a few questions about how the process works and how to handle potential issues. Here are some of the most common questions I’ve encountered:
How often does data sync occur?
The sync frequency depends on how you’ve set up the integration. If you’re using a webhook to send orders from WooCommerce to Google Sheets, the data syncs almost instantly after an event (like order creation or update) occurs.
However, if you’re using tools like Zapier or custom scripts with scheduled triggers, the sync might occur every few minutes or at intervals you define.
Can I customize the data fields that are sent to Google Sheets?
Absolutely. You have full control over which fields are sent to Google Sheets. With a custom script, you can extract and format any data from the WooCommerce order payload. Common fields include:
- Order Number
- Customer Name
- Order Status
- Products Ordered
If you need additional fields like shipping method or payment details, you can easily add them to your script or plugin configuration. If you couldn’t set new fields, contact our support.
What happens if there is an error in the sync process?
Errors can occur for various reasons, such as:
- A webhook delivery failure.
- Formatting issues in the Google Sheet.
- Missing or incorrect data from WooCommerce.
Here’s what you can do:
- Make Sure in Manage Deployments the “Who Can Access” Option is Set to Anyone: Go to your Google Apps Script deployment settings, and confirm that the “Who Can Access” field is set to Anyone. If this isn’t configured, the webhook won’t be able to trigger the script.
- Check WooCommerce Webhook Logs: Go to WooCommerce > Status > Logs and look for any webhook-related errors.
- Implement Error Notifications: Add error-handling code to your script to send an email or log the error whenever something goes wrong.
Whether you’re syncing WooCommerce orders to Google Sheets in real-time or customizing data fields, knowing the answers to these common questions can make the process smoother. If you encounter challenges or need a secure, efficient solution, don’t hesitate to ask for help.
Conclusion
Syncing your WooCommerce orders to Google Sheets is a smart way to keep your data organized, accessible, and actionable. It allows you to centralize order management, analyze sales trends, and share updates with your team—all in one place. If you’re managing a growing WooCommerce store, this automation can save you time and reduce errors.
Setting up this process doesn’t have to be complicated. Whether you choose to use a plugin, tools like Zapier, or a custom Google Apps Script, the key is finding a solution that fits your workflow. For real-time syncing, webhooks are an excellent option. They ensure your Google Sheets are updated instantly whenever an order is created or updated.
I encourage you to explore the method that works best for your store’s needs. If you value flexibility, custom scripts let you tailor the integration to include only the fields you want. On the other hand, plugins can simplify the process for beginners.
Taking this step to send orders from WooCommerce to Google Sheets can transform the way you manage your store. So, start small, test the process, and scale it as your business grows. And if you need a hand with implementation, don’t hesitate to reach out for support.
Join the Conversation!
Have you tried syncing WooCommerce orders to Google Sheets? What challenges or successes have you experienced? Share your thoughts, ask questions, or let us know your tips in the comments below. We’d love to hear from you!


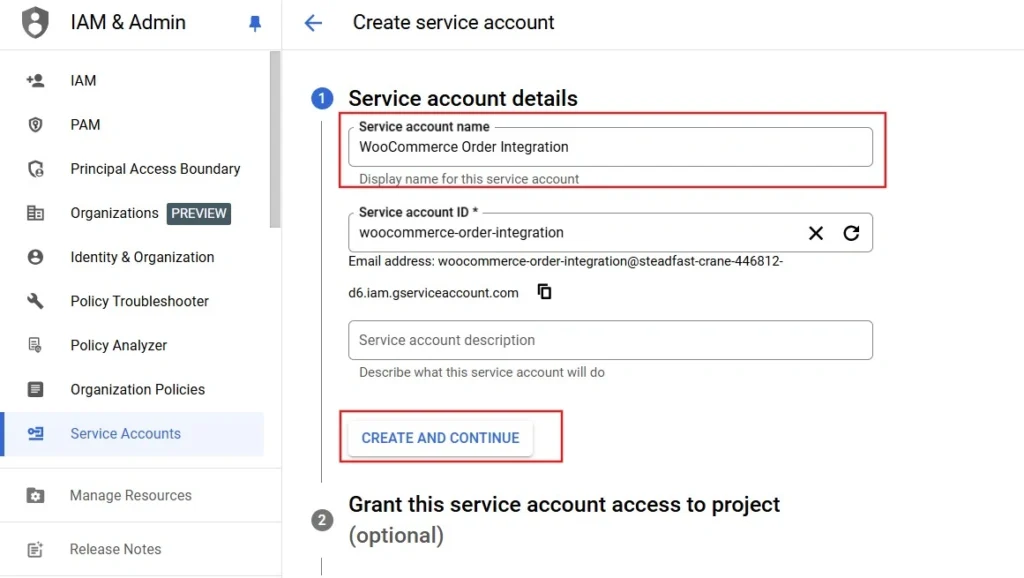 Enter service account name and click on create
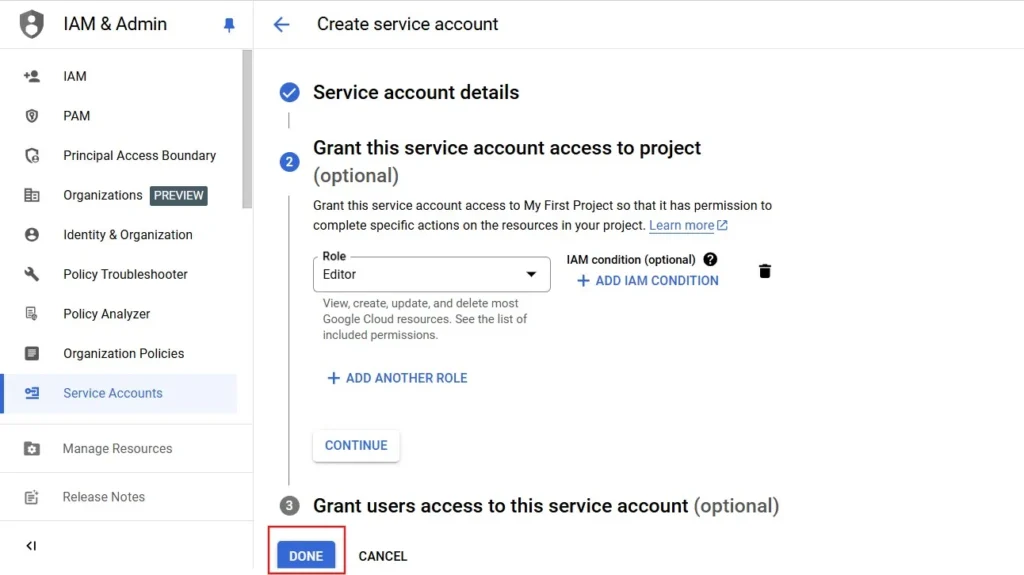 Set Role to Editor then click on “DONE”
 On the left menu, click on IAM & Admin
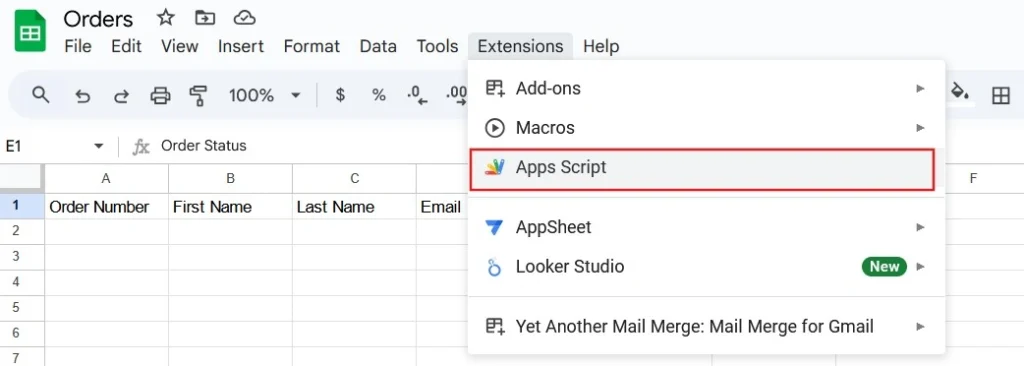 Go to Extensions > Apps Script.

 Set Who has access to Anyone