Installing WordPress is an essential step for anyone looking to build a website. This comprehensive guide will walk you through each step of the process, ensuring a smooth and successful WordPress installation. Whether you’re a beginner or someone who’s done it before, we’ll cover all the details to answer your questions about how to install WordPress software. Before diving into this article, we recommend exploring these related articles:
Who Can Use WordPress and for What Purposes?
Different Types of Web Hosting (Shared, VPS, Managed)
How to connect a domain in WordPress
Article Topics
- Why Proper Installation is Important
- Prerequisites for WordPress Installation
- Step-by-Step Process to Install WordPress
- Common Post-Installation Steps
- Troubleshooting Installation Issues
- FAQ About WordPress Installation
- Conclusion
Why Proper Installation is Important
A proper WordPress installation lays the groundwork for a fast, secure, and customizable website. Skipping steps or mishandling the setup can lead to issues that cost you time, money, and even credibility. Here’s why getting it right from the start matters:
1. Optimal Site Performance
Proper WordPress installation ensures your website runs smoothly and loads quickly. Slow-loading sites frustrate visitors__ 53% of users will abandon a page that takes longer than three seconds to load. Correctly configuring your hosting environment, database, and core WordPress files during installation minimizes potential bottlenecks.
For example, using HTTPS right from the start improves loading times and ensures secure data transmission. Similarly, optimizing your database structure at installation prevents bloating, helping your website handle traffic better.
2. Enhanced Security
A poorly executed WordPress installation leaves your site vulnerable to attacks. Hackers often exploit default settings, outdated files, or improper permissions. By taking security precautions during installation, such as setting strong admin credentials and configuring file permissions, you reduce your risk significantly.
Enabling automatic updates for WordPress core, plugins, and themes during setup also keeps your site protected against known vulnerabilities. Websites using outdated WordPress versions are 3x more likely to get hacked.
3. Better Customization Options
Proper installation ensures you have the flexibility to tailor your site exactly how you want it. By starting with the right permalink structure, enabling appropriate plugins, and selecting a lightweight theme, you avoid unnecessary roadblocks down the line.
You also ensure compatibility with advanced features, like e-commerce integrations or membership systems, that might not function properly with an incorrect setup. Customization becomes seamless when the foundation is solid.
Prerequisites for WordPress Installation
To install WordPress successfully, you need two essential prerequisites: a domain and reliable hosting. These are the building blocks of your website, and choosing the right ones is critical to your site’s performance and success.
What is a Domain?
A domain is your website’s address on the internet, like example.com. It’s how visitors find and access your site. Think of it as the nameplate on your online storefront. Choose a domain that’s easy to remember, relevant to your niche, and preferably includes your target keywords.
Tips For Picking The Right Domain Name
What is Hosting?
Web hosting is the server space where all your website’s files, data, and content are stored. Without hosting, your website cannot exist online. Hosting affects everything from how fast your site loads to how much traffic it can handle.
Why Reliable Hosting Matters for WordPress
WordPress relies heavily on a well-optimized hosting environment to perform at its best. Reliable hosting ensures your site loads quickly, stays online even during traffic spikes, and remains secure from cyber threats.
Here are a few key factors to consider when choosing hosting for WordPress:
- Performance: Look for hosting that guarantees high uptime and fast load times. A 1-second delay in page load time can reduce conversions by 7%.
- Security: Choose hosting providers that offer features like SSL certificates, firewalls, and regular backups to protect your data.
- WordPress Compatibility: Some hosts specialize in WordPress-specific features, like one-click installations and automatic updates, which make managing your site easier.
- Scalability: As your website grows, your hosting should accommodate increased traffic without compromising performance.
Shared hosting may work for small sites, but for better performance and security, consider managed WordPress hosting or VPS.For more detail check out this article
Different Types of Web Hosting (Shared, VPS, Managed)
Connecting the domain to the host
Once you’ve selected a domain and hosting, the next step is connecting the two. This ensures your domain points to your hosting provider’s servers, making your site accessible. Need help? Check out our previous article about connecting the domain to the host. It includes all the steps to set this up seamlessly.
How to connect a domain in WordPress
Downloading WordPress Software
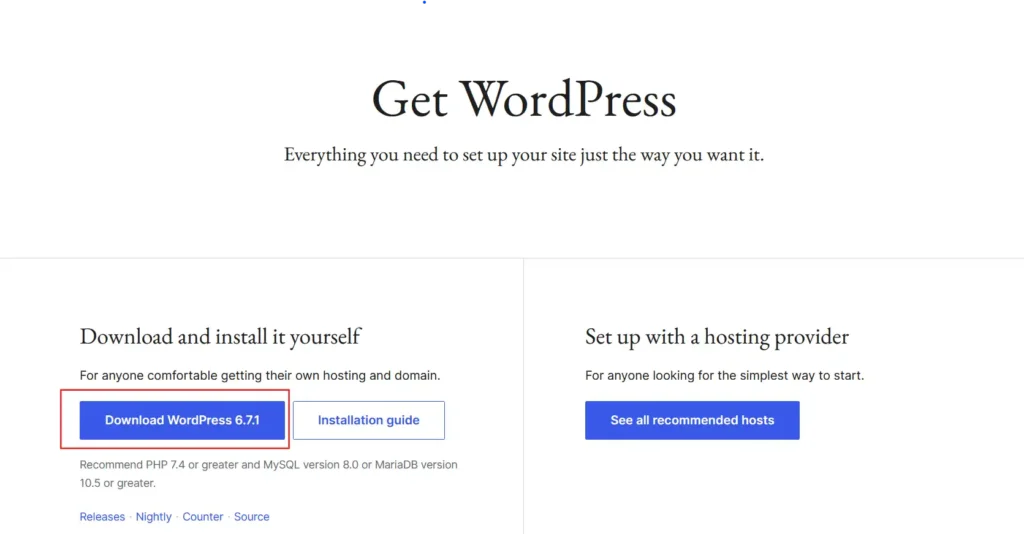
One of the key prerequisites for WordPress installation is downloading the WordPress software. This is a straightforward process, but it’s important to ensure you get the software from the official source: WordPress.org. Avoid third-party sites to guarantee you’re downloading the most secure and up-to-date version.
Step-by-Step Instructions for Downloading WordPress
- Visit the Official WordPress Website Head over to WordPress.org. This is the only trusted source for downloading the WordPress software.
- Click ‘Download WordPress’ Clicking the button will take you to the download page.
- Start the Download Click the “Download” button to save the compressed WordPress file (a .zip file) to your computer. It’s a lightweight download, so it should only take a few seconds on most internet connections.
- Save the Files Save the .zip file in a location where you can easily find it later. You’ll upload this .zip file directly to your hosting server during the installation process.
How to Install WordPress on CPanel
Set Up an FTP Client (Optional)
When managing WordPress files, you can choose between using an FTP client or your hosting control panel. While an FTP client gives you direct access to your site’s files, many hosting providers offer built-in file managers, such as cPanel’s File Manager or DirectAdmin’s File Manager. If you prefer simplicity, using the hosting control panel’s file manager is sufficient, and setting up an FTP account isn’t necessary so you can skip this section.
What Is FTP?
FTP (File Transfer Protocol) is a method for transferring files between your computer and your hosting server. It’s widely used for uploading, editing, or managing website files.
Beginner-Friendly FTP Tools
If you choose to use FTP, beginner-friendly tools like FileZilla or Cyberduck make the process straightforward. These tools are free and compatible with most hosting providers.
Setting Up an FTP Account in cPanel
- Log in to cPanel
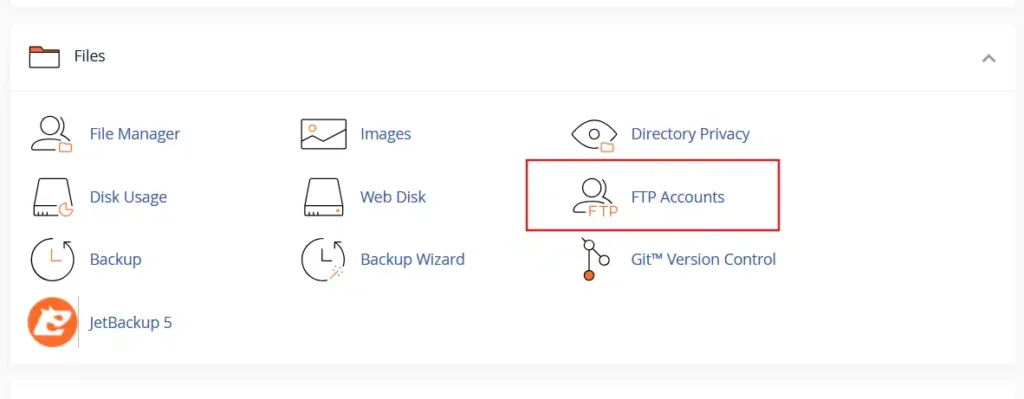
Access your hosting account and log in to the cPanel dashboard. - Navigate to the FTP Section
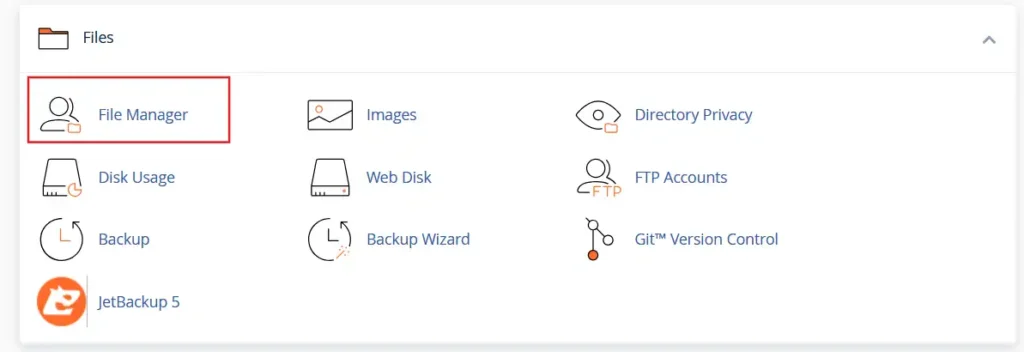
In cPanel, scroll down to the “Files” section and click on FTP Accounts.
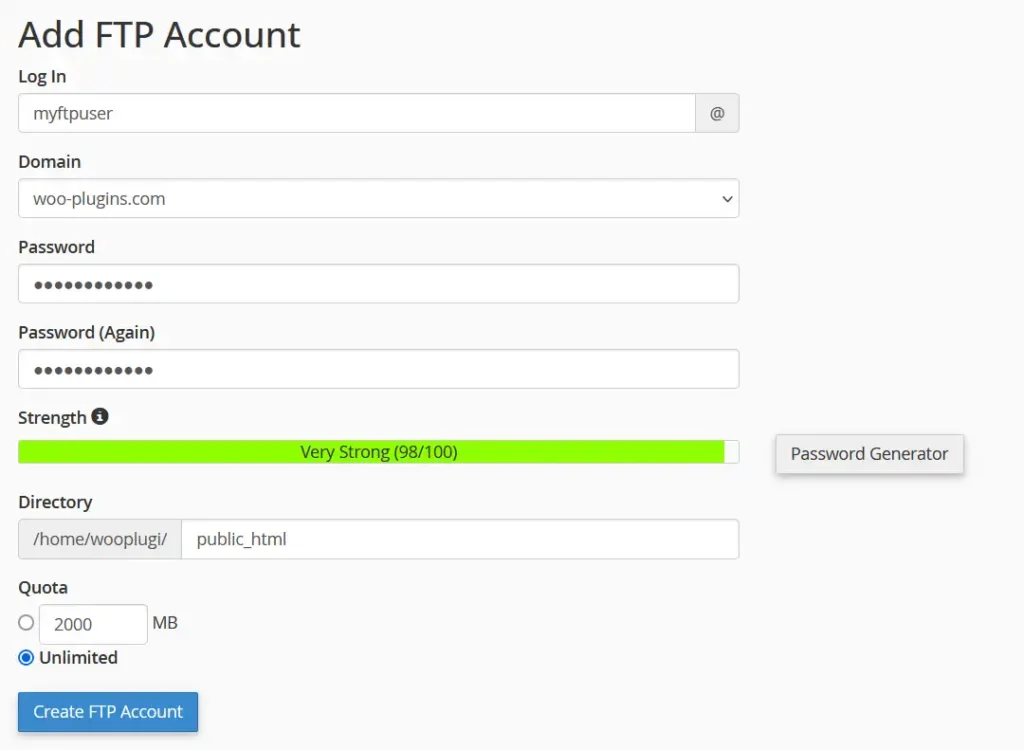
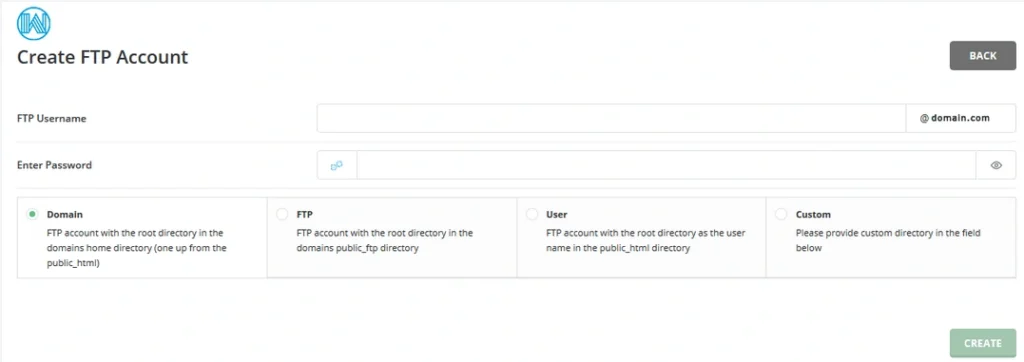
- Create a New FTP Account
- Enter a username(Log In). For example:
myftpuser. - Select a Domain (default is your main domain, you can use other domains and subdomains if any)
- Set a strong password. Use a mix of letters, numbers, and symbols. (You can use “Password Generator” button to generate strong password). Save the password in your clipboard.
- Select the directory the FTP account will access. For WordPress, this is typically the root folder (e.g.,
public_html). - Set a quota or leave it as “Unlimited.”
- Enter a username(Log In). For example:
- Save the Settings
Once you fill in the details, click Create FTP Account. - Retrieve FTP Details
You’ll need these details for your FTP client:(click on “Configure FTP Client” to show the details)- FTP server address (e.g.,
ftp.yourdomain.com) - Username and password
- Port number (usually 21)
- FTP server address (e.g.,
How to Install WordPress on DirectAdmin
- Log in to DirectAdmin
Use your hosting credentials to access DirectAdmin’s dashboard. - Find FTP Management
Under the “Account Manager” section, click on FTP Management.
- Create a New FTP Account
- Provide a username.
- Set a password.
- Choose the directory for access (e.g.,
public_htmlfor WordPress). - Click Create to finalize the account setup.
- Gather FTP Information
Similar to cPanel, note the following details:- FTP server address
- Username and password
- Port (usually 21)
Using Your Hosting Control Panel’s File Manager
If setting up an FTP account feels unnecessary, you can use the hosting provider’s File Manager to upload and manage WordPress files. Both cPanel and DirectAdmin include this feature, which is accessible directly from the dashboard.
- In cPanel, click on File Manager under the “Files” section.
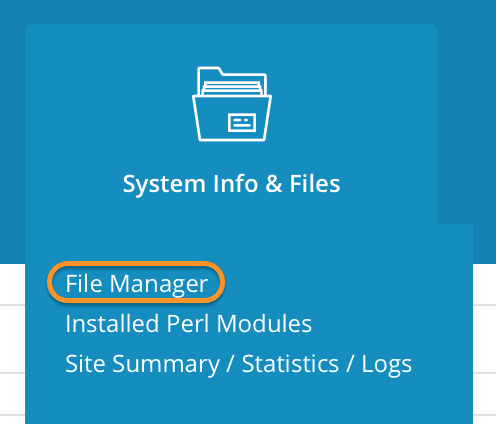
- In DirectAdmin, find File Manager under the “System Info & Files” category.
This method skips the need for an external FTP client and works entirely within your browser.
Both options—FTP and file managers—are effective, but for beginners, the built-in file manager is often the easiest way to manage WordPress files. Choose the method that best fits your technical comfort level.
Step-by-Step Process to Install WordPress
There are two main ways to install WordPress: one-click installation and manual installation. The one-click installation method is the easiest and most beginner-friendly option. Many hosting providers offer tools like Softaculous or Fantastico, which allow you to install WordPress with just a few clicks, saving time and effort.
The manual installation, on the other hand, requires more steps and technical knowledge. It involves downloading WordPress, uploading files to your hosting server, and setting up a database. This method gives you more control and is useful for advanced users who want a customized setup.
For most beginners, the one-click option is highly recommended as it’s faster and doesn’t require dealing with technical configurations. Advanced users or those with specific needs might prefer the manual method for greater flexibility.
1. Using a One-Click Installer (Simplest Method – Recommended for Beginners)
If you’re looking for the easiest way to set up WordPress, a one-click WordPress installation is the ideal choice. Many hosting providers offer tools like Softaculous or similar one-click installers, making the process quick and hassle-free. You won’t need to download or upload files, just a few clicks manually, and your WordPress site is ready to go.
What Are One-Click Installers?
One-click installers are software tools provided by hosting companies that automate the installation of popular applications, including WordPress. They eliminate the need for manual setup, saving you time and reducing the risk of errors.
Hosting providers like Bluehost, SiteGround, and HostGator typically include these tools in their control panels.
Step-by-Step Guide: Installing WordPress with Softaculous
Softaculous is one of the most common one-click installers. Follow these steps to set up WordPress using this tool:
- Access Your Hosting Control Panel
- Log in to your hosting account’s control panel (e.g., cPanel or DirectAdmin).
- Look for the Softaculous Apps Installer or similar tools under the “Software” section.
- Search for WordPress
-
- In Softaculous, use the search bar to find WordPress.
- Click on the WordPress icon to begin.
-
- Start the Installation Process
- Click the Install Now button.
- Click the Install Now button.
- Configure Installation Details
- Choose Protocol: Select “https://” if you’ve set up an SSL certificate; otherwise, choose “http://”.
- Choose Domain: Select the domain you want to install WordPress on.
- Directory: Leave this blank if you’re installing WordPress on the root domain.
- Site Settings
- Enter a Site Name and Site Description. You can edit these later in the WordPress dashboard.
- Enter a Site Name and Site Description. You can edit these later in the WordPress dashboard.
- Admin Account
- Set up a username, password, and email for the admin account. Use strong credentials to secure your site.
- Set up a username, password, and email for the admin account. Use strong credentials to secure your site.
- Select Plugins and Themes (Optional)
- Some installers let you pre-install popular plugins or choose a theme.
- Advanced Options (Optional)
- You can customize database names or leave the defaults. Advanced users may prefer tweaking these settings, but they’re not mandatory.
- Click Install
- Review the details and click Install.
- Wait a few moments for the process to complete.
- Access Your WordPress Site
- Once the installation is finished, you’ll receive links to your new WordPress site and the admin dashboard.
Benefits of One-Click WordPress Installation
- Time-Saving: The entire process typically takes under 5 minutes.
- Error-Free: One-click installers handle all technical details like database creation and file permissions.
- Beginner-Friendly: No coding or manual file uploads are required, making it perfect for those new to WordPress.
2. Manual WordPress Installation
To install WordPress manually, you’ll need to follow three essential steps, each requiring careful attention. First, you need to create a database, which involves setting up a MySQL database in your hosting control panel, such as cPanel. Next, you’ll upload WordPress files to your hosting server, either through an FTP client or a file manager. Finally, you’ll run the installation script to connect WordPress to your database and complete the setup. Each step is crucial, and we’ve provided detailed, step-by-step instructions in the rest of this article to guide you through the process seamlessly.
1. Create a Database
When performing a manual WordPress installation, creating a MySQL database is a key step. This database stores all the information your WordPress site needs, from user data to post content. If your hosting uses cPanel, the process is straightforward.
Step-by-Step Guide to Creating a MySQL Database in cPanel
- Log in to cPanel
- Open your hosting provider’s cPanel login page.
- Enter your credentials and log in to access the control panel.
- Navigate to the MySQL Database Section
- Look for the Databases section in cPanel.
- Click on MySQL Databases or Manage My Databases to begin the setup.
- Create a New Database
- In the Create New Database field, enter a name for your database. Keep it simple and descriptive.
- Click Create Database to confirm.
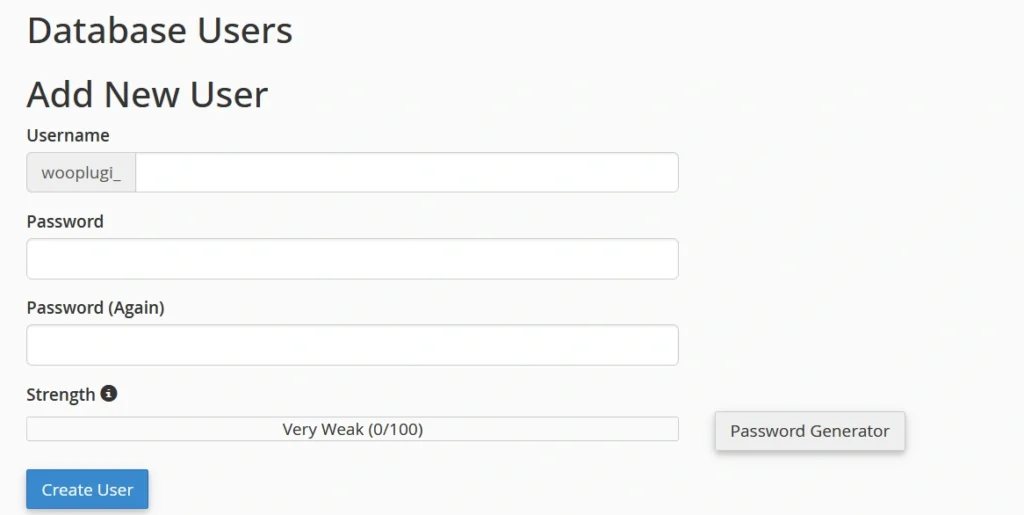
- Add a Database User
- Scroll down to the Database Users section.
- Create a new database user by entering a username and password. Use a strong password to secure your database.
- Click Create User to finalize.
- Assign the User to the Database
- Navigate to the Add User to Database section.
- Select the user you just created from the dropdown menu.
- Choose the database you created earlier.
- Click Add to link the user to the database.
- Set Permissions
- When prompted, select All Privileges to grant the user full access to the database.
- Click Make Changes to save your settings.
Best Practices for Setting Up a Database
- Use Secure Credentials: Always use strong usernames and passwords for your database users to prevent unauthorized access.
- Keep Track of Details: Note down your database name, username, and password. You’ll need these later during WordPress configuration.
- Avoid Overlapping Names: Ensure your database and user names don’t overlap with existing ones to prevent conflicts.
Creating a database is a crucial part of manual WordPress installation. Once this step is complete, you’re ready to move forward and connect your database to WordPress during the configuration process. For detailed guidance on installing WordPress, continue with the next steps of the manual installation process.
2. Upload WordPress Files
When performing a manual WordPress installation, one crucial step is uploading the WordPress files to your hosting server. This can be done using an FTP client or the hosting control panel’s File Manager. Here’s a simple guide for both methods:
-Using an FTP Client
- Install an FTP Client
Start by downloading an FTP client like FileZilla. It’s free, beginner-friendly, and widely used. - Connect to Your Server
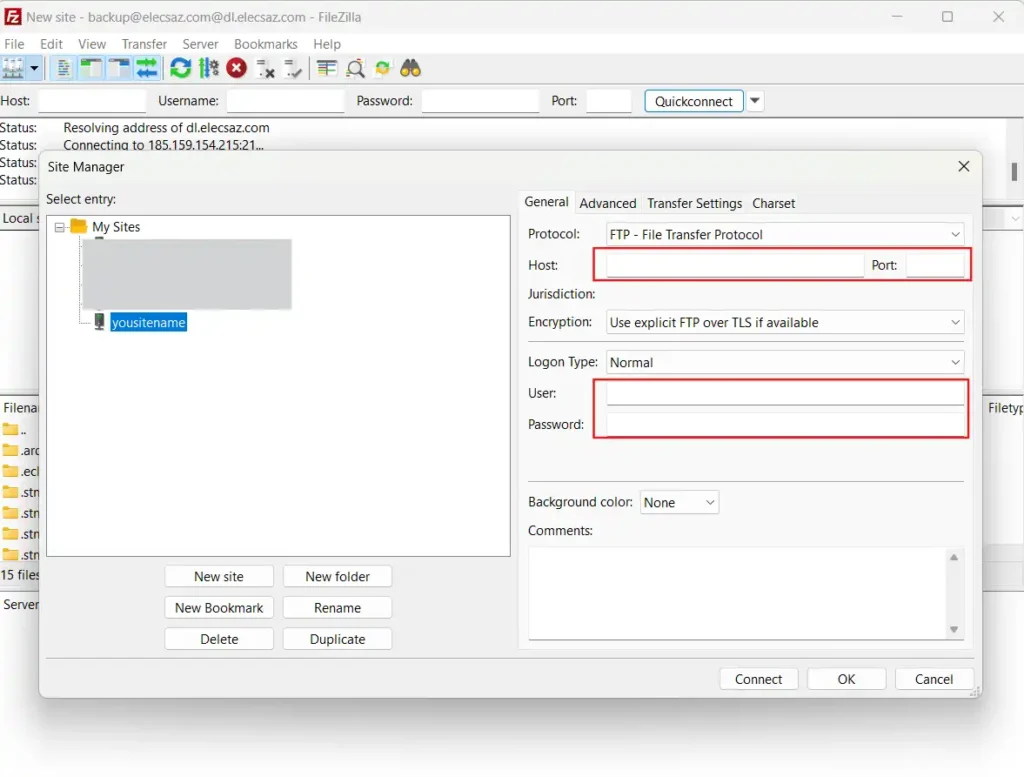
Open the FTP client and use the credentials from the FTP account created earlier (server, username, and password). If your host uses a specific port, include it too. - Upload WordPress Files
- Extract the WordPress
.zipfile you downloaded earlier. - Navigate to the folder where WordPress files are located.
- In the FTP client, go to the
public_htmldirectory (or your site’s root folder). - Upload all the extracted WordPress files and folders.
- Extract the WordPress
- Wait for Completion
The upload may take a few minutes, depending on your internet speed. Ensure all files are transferred successfully.
-Using the File Manager in cPanel
- Access File Manager
Log in to cPanel and open the File Manager. - Navigate to the Root Directory
Go to thepublic_htmldirectory, or the folder associated with your domain. - Upload the WordPress ZIP File
Click Upload, choose the WordPress.zipfile, and wait for the upload to finish. - Extract the ZIP File
Once the upload is complete, select the file in File Manager, right-click, and choose Extract. This will unpack the WordPress files into the same directory. - Organize Files if Needed
If the files are extracted into a subfolder (e.g.,wordpress), move them to the root directory (public_html) to ensure proper functionality.
Which Method Should You Choose?
For beginners, the File Manager is easier to use since it doesn’t require additional software. However, FTP is better for handling bulk uploads or managing large websites.
By completing this step, your WordPress files will be ready for the next phase: running the installation script to connect your database and finalize the setup.
3. Run the Installation Script
Once the WordPress files are uploaded, the next step is to run the WordPress installer to set up your website. This involves accessing your domain and following the WordPress setup wizard. Here’s a straightforward guide:
1. Access the WordPress Installer
- Open your browser and type your domain name (e.g.,
www.yourdomain.com). - If everything is correctly configured, the WordPress installer will automatically launch.
2. Select Your Language
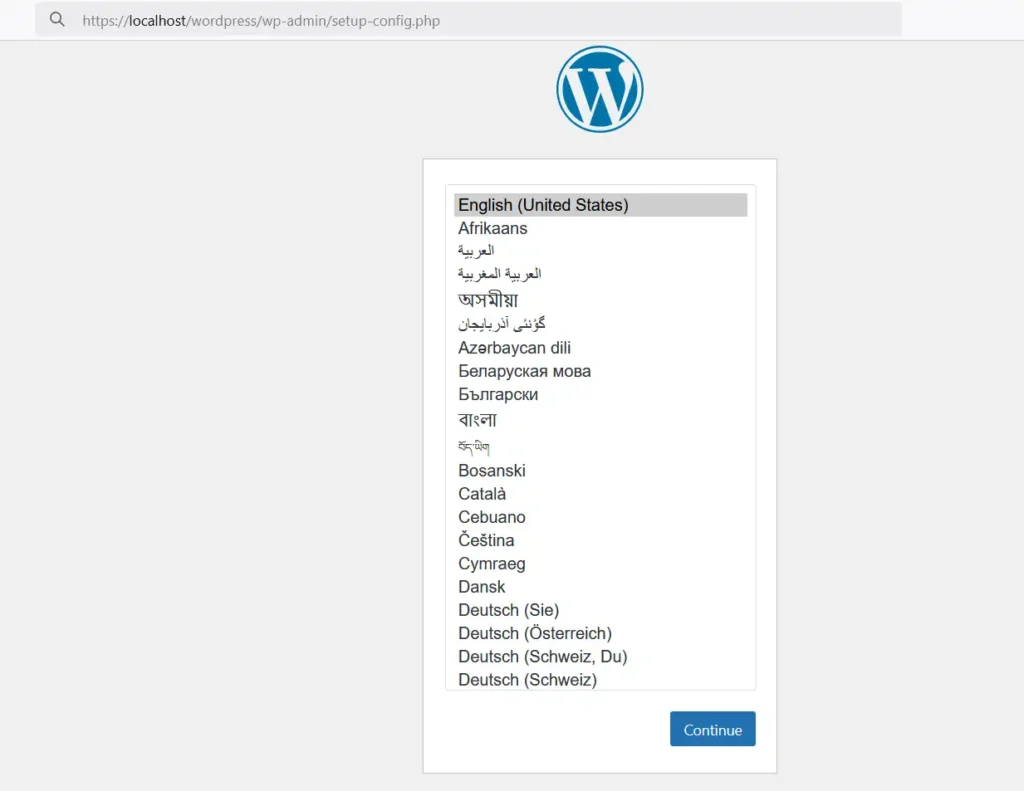
The first screen of the WordPress setup wizard allows you to choose your preferred language.
- Select your language.
- Click Continue to proceed.
3. Connect to Your Database
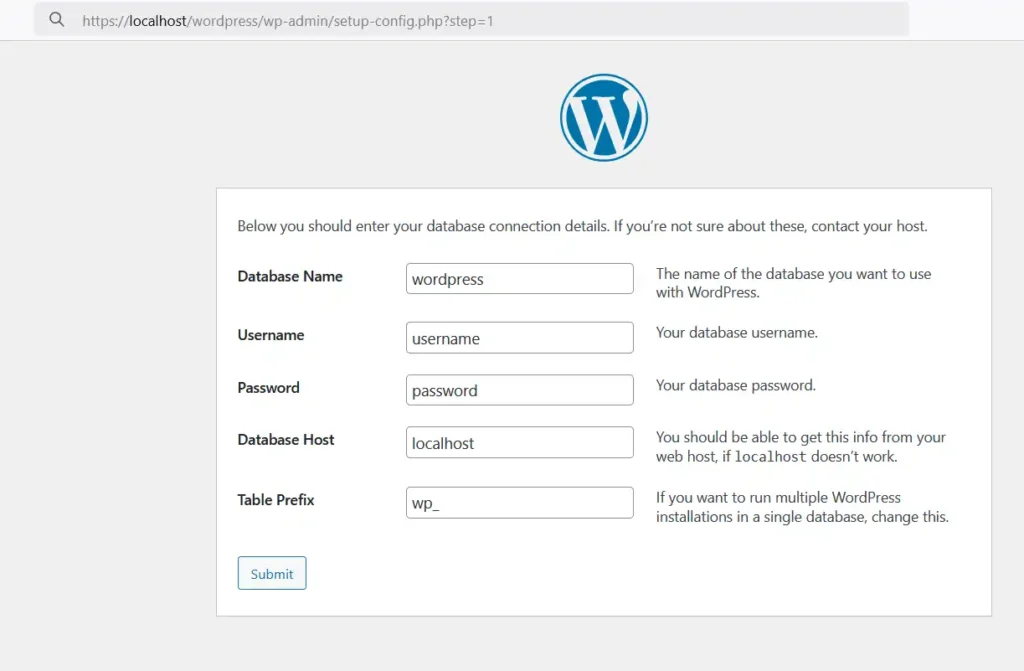
- The installer will prompt you to enter the database information you created earlier:
- Database Name: Enter the name of the MySQL database.
- Username: Use the username from your database setup.
- Password: Enter the password you set during database creation.
- Database Host: Most hosts use
localhost. If your host requires a different value, check their documentation. - Table Prefix: The default is
wp_, but you can change it for added security (e.g.,mywp_).
- Click Submit. If the connection is successful, you’ll move to the next step.
4. Run the Installation
After connecting to the database, click Run the Installation to let WordPress set up the database tables. This process is automated and takes just a few seconds.
5. Set Up Your Website Details
The WordPress setup wizard will now prompt you to configure essential site details:
- Site Title: Enter the name of your website. This can be changed later in the settings.
- Username: Create a unique username for your WordPress admin account. Avoid using “admin” for security reasons.
- Password: Choose a strong password. The wizard will indicate its strength.
- Your Email Address: Enter an active email for admin notifications and password recovery.
- Search Engine Visibility: You can choose to discourage search engines from indexing your site until it’s ready. Leave this unchecked unless your site is under construction.
Click Install WordPress to finalize the setup.
6. Login to Your WordPress Dashboard
Once the installation is complete, you’ll see a success message.
- Click Log In to access your WordPress dashboard.
- Use the username and password you just created to log in.
By completing these steps, you now have a fully functional WordPress site. From here, you can customize your theme, install plugins, and start creating content. The WordPress setup wizard makes the process straightforward, even for beginners.
Common Post-Installation Steps
1. Log into WordPress Dashboard
Accessing the WordPress Dashboard is the first step to managing your new website. This admin area is where you’ll control every aspect of your site, from customizing themes to publishing content and installing plugins.
How to Access the WordPress Dashboard
- Open Your Browser: Navigate to your site’s login page by typing:
www.yourdomain.com/wp-admin - Enter Your Credentials:
- Username: Use the admin username you created during the installation process.
- Password: Enter the secure password you set.
- Click Log In: After entering the correct details, you’ll be redirected to the WordPress Dashboard.
What to Do If You Forget Your Login Details
If you’re unable to log in:
- Use the Forgot Password link on the login page.
- Enter the email address associated with your admin account to reset your password.
First Look at the WordPress Dashboard
Once logged in, you’ll see a menu on the left-hand side with all the options for managing your site, such as:
- Posts: Create and manage blog posts.
- Pages: Build static pages like “About Us” or “Contact.”
- Appearance: Customize your theme and layout.
- Plugins: Add extra features to your site.
- Settings: Adjust your general, writing, and reading settings.
Logging into the WordPress Dashboard is straightforward and takes you one step closer to creating a fully functional website. Bookmark the login page for quick access in the future!
2. Update Default Settings in WordPress
Once your WordPress site is live, updating the default settings is crucial to ensure your site looks professional, reflects your brand, and functions optimally. These settings help shape the site’s identity and improve its performance for visitors and search engines alike.
1. Change Site Title, Tagline, and Time Zone
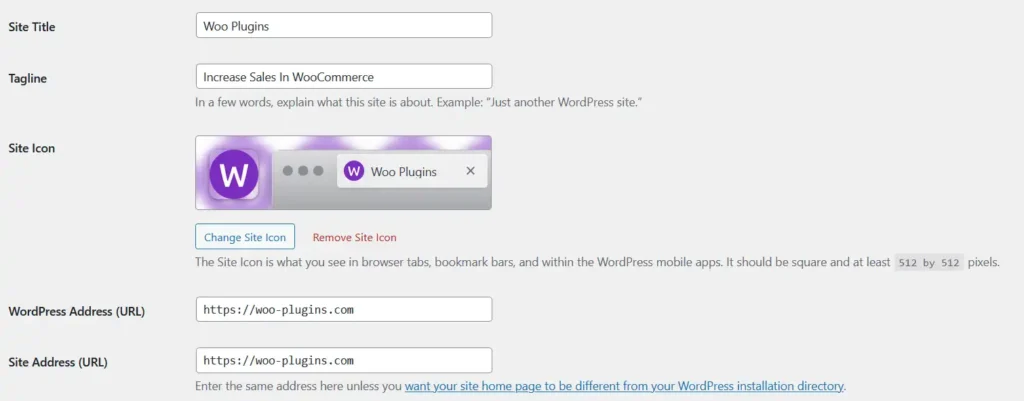
Your site’s title and tagline represent your website’s purpose and appear in browser tabs and search engine results. Setting the correct time zone ensures accurate timestamps for posts and updates.
Here’s how to update these settings:
- Go to your WordPress Dashboard.
- Navigate to Settings > General.
- Update the following fields:
- Site Title: Enter your website’s name (e.g., “My Awesome Blog”).
- Tagline: Write a short description or tagline (e.g., “Sharing tips and tricks for beginners”). A meaningful tagline boosts your site’s identity and can make a good impression on visitors.
- Scroll to Time Zone:
- Select your region or match your time zone with the UTC offset.
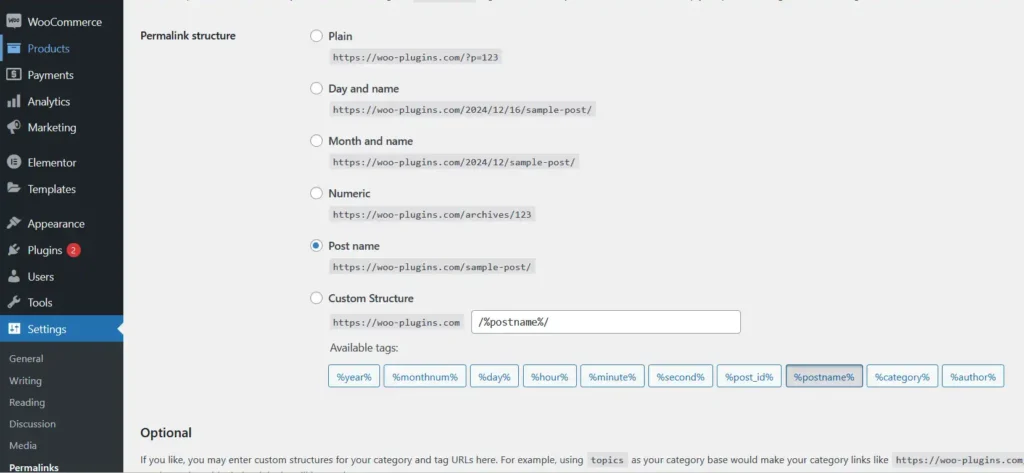
2. Configure the Permalink Structure for SEO
Permalinks are the permanent URLs of your posts and pages. Optimizing the permalink structure is essential for better readability and SEO performance. Clean permalinks not only look professional but also help search engines understand your content better.
To configure permalinks:
- In the Dashboard, go to Settings > Permalinks.
- Select the Post Name option:
- This structure makes URLs clean and descriptive (e.g.,
yourdomain.com/sample-post).
- This structure makes URLs clean and descriptive (e.g.,
- Click Save Changes to apply.
Updating these default settings is a quick but impactful step. These changes help establish your site’s identity, improve SEO, and ensure a smooth experience for your audience.
3. Install Themes and Plugins
Customizing your site with themes and plugins is one of the most exciting parts of building a WordPress website. Themes control the appearance, while plugins add features and functionality. Choosing beginner-friendly options can save time and make your site easier to manage.
Installing a WordPress Theme
A theme sets the visual tone of your website. Whether you want a sleek portfolio, a professional business site, or a personal blog, there are thousands of free and premium themes available.
Here’s how to install a theme:
- Go to your WordPress Dashboard.
- Navigate to Appearance > Themes.
- Click on Add New at the top of the page.
- Use the Search Bar to find beginner-friendly themes like Astra, GeneratePress, or Neve.
- Hover over the theme you like and click Install.
- Once installed, click Activate to apply it to your site.
Choose a responsive theme that looks great on all devices and supports your site’s goals.
Installing WordPress Plugins
Plugins allow you to expand your site’s functionality without writing any code. Whether you need an SEO boost, security enhancements, or social media integration, plugins can handle it.
Here’s how to install a plugin:
- Go to your Dashboard and navigate to Plugins > Add New.
- Use the Search Bar to find a plugin. For example:
- Rank Math: For optimizing content for search engines.
- WPForms: For creating contact forms.
- WooCommerce: For setting up an online store.
- Click Install Now next to your chosen plugin.
- After installation, click Activate to enable the plugin on your site.
Keep your plugins to a minimum for faster loading times and easier management.
Recommendations for Beginners
- Themes: Stick with lightweight, beginner-friendly options that come with starter templates. Popular choices include Astra, OceanWP, and Kadence.
- Plugins: Focus on essentials:
- Elementor: Drag-and-drop page builder for easy customization.
- Jetpack: Security, performance, and marketing tools.
- UpdraftPlus: For regular site backups.
By choosing the right themes and plugins, you can customize your WordPress site to look great and perform perfectly for your visitors.
Troubleshooting Installation Issues
Setting up WordPress is usually straightforward, but you might run into a few bumps along the way. Here are some common WordPress Installation Errors and simple fixes to help you stay on track.
1. Database Connection Error
This error often shows up as “Error establishing a database connection”. It happens when WordPress cannot connect to your MySQL database.
Solution:
- Double-check the database credentials in your wp-config.php file.
- Make sure the database name, username, password, and host are correct.
- If you’re unsure, you can find these details in your hosting control panel under Databases.
If your hosting uses localhost for the database host, confirm it hasn’t been changed to a specific server address.
2. File Permission Issues
Incorrect file or folder permissions can prevent WordPress from functioning properly. You might see errors when trying to upload files or run scripts.
Solution:
- Use your hosting’s File Manager or an FTP client to check permissions.
- Set folder permissions to 755 and files to 644.
- For the wp-config.php file, ensure permissions are more restrictive, such as 600.
Check your hosting’s documentation for any specific file permission requirements.
3. White Screen of Death (WSOD)
A blank white screen with no error messages can feel alarming. This is often caused by a memory limit issue or a PHP error.
Solution:
- Increase the memory limit in your wp-config.php file by adding this line:
define("WP_MEMORY_LIMIT", "128M"); - Disable plugins by renaming the plugins folder via FTP or file manager. This helps identify if a plugin is causing the problem.
- Switch to a default theme (like Twenty Twenty-Three) to check for theme-related issues.
4. “404 Not Found” Errors After Installation
If your site or specific pages show 404 errors after installation, it’s likely a permalink issue.
Solution:
- Go to Settings > Permalinks in your WordPress Dashboard.
- Re-save the settings to regenerate the .htaccess file.
- If this doesn’t work, manually create a .htaccess file in your root directory (this file may be hidden, go to the file manager setting and check “Show Hidden Files (dotfiles)” and edit it) and add the default WordPress rules:
# BEGIN WordPress <IfModule mod_rewrite.c> RewriteEngine On RewriteBase / RewriteRule ^index\.php$ - [L] RewriteCond %{REQUEST_FILENAME} !-f RewriteCond %{REQUEST_FILENAME} !-d RewriteRule . /index.php [L] </IfModule> # END WordPress
5. Missing PHP Extensions
During installation, WordPress may notify you about missing PHP extensions like curl or mbstring.
Solution:
- Log into your hosting control panel and look for PHP Settings or PHP Extensions.
- Enable the missing extensions and restart your web server if needed.
If you can’t enable extensions, contact your hosting provider for assistance.
Additional Resources
For more detailed help, check out these trusted resources:
- WordPress Support Forums
- Your hosting provider’s knowledge base or customer support team.
No matter the issue, there’s usually a solution close at hand. Tackle these errors step by step, and you’ll have your WordPress site up and running smoothly in no time.
FAQ About WordPress Installation
Here are answers to some of the most common questions about WordPress installation.
Can I Install WordPress for Free?
Yes, WordPress itself is completely free to download and use. You can find the installation files at WordPress.org. However, you’ll need a hosting plan and a domain name to set up your website, which may incur costs. Some hosting providers also offer free plans, but they usually come with limitations.
Do I Need Coding Skills to Install WordPress?
No coding skills are required to install WordPress. Most hosting providers offer a one-click WordPress installation option, making the process quick and beginner-friendly. Even for a manual installation, you just follow step-by-step instructions without needing to write any code.
What Is the Difference Between WordPress.com and WordPress.org Installation?
The main difference lies in control and flexibility:
- WordPress.com hosts your site for you, but limits customization and features unless you upgrade to a paid plan.
- WordPress.org gives you full control over your site, but you’ll need to manage hosting and installation yourself.
Check out our detailed article on the differences between WordPress.com and WordPress.org for more insights.
Introduction to WordPress.com VS WordPress.org
Can I Switch Hosting Providers After Installing WordPress?
Yes, WordPress is highly portable. You can migrate your site to a new hosting provider at any time. Most hosts offer free migration services, or you can use plugins like All-in-One WP Migration or UpdraftPlus to move your site easily.
What Is Required to Install WordPress?
To install WordPress, you’ll need:
- A hosting account with access to a control panel like cPanel or DirectAdmin.
- A registered domain name.
- Basic server requirements like PHP 7.4+ and MySQL 5.7+.
- The WordPress installation files, which are available on WordPress.org.
How Long Does It Take to Install WordPress?
A one-click installation usually takes less than 5 minutes. Manual installation can take around 15–30 minutes, depending on your familiarity with the process.
Can I Install WordPress Locally?
Yes, you can install WordPress on your local computer for testing or development purposes. Tools like XAMPP, Local by Flywheel, or MAMP make it easy to set up a local WordPress environment.
Conclusion
By now, you’ve seen how straightforward the WordPress installation process can be, whether you choose the one-click installer or the manual route. Setting up WordPress involves three core steps: creating a database, uploading the WordPress files, and running the installer script. Once installed, you can log into the dashboard to start customizing your site.
WordPress offers endless possibilities. You can choose from thousands of themes to create a unique design and install plugins to add advanced functionality. Whether you’re starting a blog, building an online store, or launching a portfolio site, WordPress has the flexibility to bring your vision to life.
After completing your setup, don’t forget to explore the built-in features like the block editor, customizable menus, and widgets. Take the time to configure essential settings, such as permalinks and site visibility, to optimize your site for visitors and search engines.
With your WordPress installation complete, the fun begins. Dive into your dashboard, experiment with new features, and turn your ideas into a fully functioning website. The possibilities are endless!
